Crowdfunding offers a fresh approach for product creators requiring less risk than traditional product launches. With platforms like Kickstarter and Indiegogo, creators have access to a massive audience of potential backers, but how does the crowdfunding process work?
This article will offer comprehensive insight into the fundraising process from start to finish. We’ll take a deep dive into the framework of a successful campaign from idea to launch and the crucial steps involved post-launch and post-campaign.
For product creators with unique products, there is no better way to launch than through crowdfunding.
With crowdfunding, you can:
- Generate revenue without inventory
- Validate demand for your new product
- Tap into a community of early adopters
- Improve your product with feedback
Contents
- From Product Idea to Crowdfunded Framework
- Milestone #1: Product positioning
- Milestone #2: Product photography
- Milestone #3: The reservation funnel
- Milestone #4: Your advertising campaign
- Milestone #5: Your campaign page
- Milestone #6: The campaign video
- Milestone #7: Launch your campaign
- The crowdfunding live campaign timeline
- The crowdfunding post-campaign timeline
- Crowdfunding timeline FAQs
- The crowdfunding timeline: final thoughts
From Product Idea to Crowdfunded Framework
So, you have a great idea for an innovative product.
That’s awesome, but it’s going to take some work to turn your idea into a successful strategy for your crowdfunding campaign.
There are seven key milestones to bring your project to life through a successful crowdfunding campaign. Some of these milestones can only be completed once previous milestones have been achieved, while you can work on others at the same time.
Here’s a breakdown of each one:
Milestone #1: Product positioning
Great product positioning is the foundation for the rest of your crowdfunding campaign. If you start with weak product positioning, your whole campaign will crumble before it gets off the ground.
So, what is great product positioning?
Great product positioning involves effectively communicating a product’s value to its target audience.
This process can be summarized in two key steps:
- Identifying the target audience.
- Articulating how the product solves their problem.
For new products, crafting effective product positioning is a dynamic process that demands flexibility and open-mindedness. Initial ideas should be treated as hypotheses, subject to validation in the market.
A helpful framework for developing product positioning is the Consumer Based Brand Equity (CBBE) Pyramid, which consists of four levels:
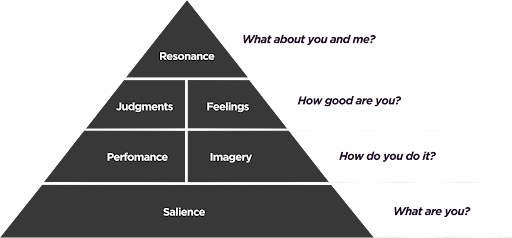
- Level 1 – Salience (What are you?): This forms the pyramid’s foundation. It involves simplifying your product’s problem-solving capabilities and category so that consumers can readily understand it.
- Level 2 – Performance and imagery (How do you do it?): Here, you outline what makes your product stand out and describe how it differs from competitors. Performance highlights what your product does better, while imagery shapes the brand’s associations.
- Level 3 – Judgments and feelings (How good are you?): Consumers assess your product’s quality and credibility at this stage. Addressing concerns and doubts while emphasizing positive judgments is crucial. Additionally, consider the emotional responses you want to evoke in consumers.
- Level 4 – Resonance (What about you and me?): At the top of the pyramid, you identify factors that foster loyalty and a strong connection between consumers and your brand. That could involve shared values, missions, or other elements that resonate with your target audience.
Resonance is particularly essential for long-term brand success. However, for new products, the initial focus should be on the lower levels of the pyramid to establish a solid foundation.
LaunchBoom offers a product positioning worksheet covering the CBBE questionnaire, target market identification, and value positioning to facilitate the development of product positioning. This worksheet helps creators refine their messaging, identify key differentiators, and create compelling headlines that succinctly communicate their product’s value.
Great product positioning is a dynamic process that involves clearly communicating a product’s value to the right audience. It starts with simplifying your product’s purpose, progresses to showcasing its unique qualities, addresses consumer judgments and feelings, and ultimately aims for resonance with your target market.
Once you’ve completed this first milestone, you will have come up with your initial hypotheses around positioning your product. That includes how you believe you should position the value of your product and whom you should target.
Again, it’s important to note that your initial product positioning is a pure hypothesis. Nailing your product positioning is a process that requires testing. Stay open and prepare for the current positioning to be challenged and changed.
Armed with this information, you are now ready to move on to building the assets you need to start your prelaunch.
Milestone #2: Product photography
Capturing product imagery is crucial to bringing your product to life and persuading backers to join your campaign. These images will be used across your entire campaign, from ads to your campaign page.
There are two main types of product imagery you can use: photorealistic renderings and photography.
Photorealistic Renderings
These are highly detailed computer-generated images of your product. They offer advantages such as speed and affordability compared to professional photography. Renderings allow precise control over product appearance, materials, lighting, and environment.
While Kickstarter requires a prototype and doesn’t permit renderings, they can be especially useful when your prototype isn’t ready, enabling you to start marketing efforts while finalizing the physical product. Contrary to a common misconception, photorealistic renderings can perform exceptionally well in marketing campaigns, driving substantial revenue.
Hiring a 3D render artist for this task is recommended, typically costing less than $1,000.
Platforms like Upwork can help you find suitable artists (or we can introduce you to one of our vetted LaunchBoom Certified Experts, who are available to all clients). Ensure you provide design files, a shot list, and reference material to help the artist create a high-quality rendering.
Photography
Product photography is essential for all campaigns and comes in three main styles: studio, location, and action:
- Studio photos: Studio photos are detailed shots of your product against a plain background, highlighting its features from various angles. Consider hiring a professional photographer for high-quality results.
- Location photos: Showcase your product in the environments where it will be used, providing potential customers a chance to envision how they might use the product. Consider different use cases and audiences, aiming for two to three diverse environments.
- Action shots: Action shots are ideal for demonstrating features that require motion or interaction. Focus on the specific action or element, eliminating distractions. Action shots can be in the form of photos or videos, depending on what best showcases the feature.
Hiring a professional photographer is recommended, but it doesn’t have to be expensive. Many creators can find affordable photographers through their networks.
Once you have your product images, you can proceed with your prelaunch marketing strategy, including building your prelaunch email list to ensure a strong start on launch.
Milestone #3: The reservation funnel
Building a highly qualified prelaunch email list is crucial for crowdfunding success.
LaunchBoom revolutionized crowdfunding in 2017 by introducing the Reservation Funnel, a game-changer for the industry.
Before we created the Reservation Funnel, it was virtually impossible to tell how qualified a pre-launch email list was before you launched.
The breakthrough came when we added one simple step: we offered a special deal to email subscribers if they put down a $1 reservation deposit.
This simple approach offered two key advantages:
- Better Purchase Intent Indicator: Making a purchase, even a $1 deposit, signaled stronger purchase intent than merely sharing an email address.
- Better Optimization For Advertising: optimizing Facebook ads based on $1 deposits vs. leads led to much higher return on ad spend.
The Reservation Funnel consists of several key steps:
- Ads: Users click on a Facebook/Instagram ad and are directed to a landing page.
- Landing Page Signup: Users are prompted to provide their email to receive launch notifications on the landing page.
- Reservation Bridge: After signing up, users are thanked and offered a chance to reserve the product with a $1 deposit, increasing conversion rates.
- Reservation Checkout: Clicking the reservation button leads users to a checkout page to complete their reservation.
- Thank You: Following checkout, users see a thank you page and are often invited to join an exclusive community.
- Welcome Email Automation: Simultaneously, users are entered into automated email sequences tailored to their VIP or non-VIP status.
The key distinction is between VIPs (those who make $1 deposits) and non-VIPs. VIPs are significantly more likely to purchase, often 30 times more so. VIP offers can include guaranteed discounts, exclusive add-ons, or early access.
An additional perk for VIPs is membership in an exclusive community, typically hosted on platforms like Facebook Groups or Discord.
Welcome email automation is crucial for engaging with subscribers effectively, with personalized messages sent from individuals rather than generic brand emails.
Understanding and implementing the Reservation Funnel can significantly boost your crowdfunding success, as it optimizes ad spending, builds a highly engaged community, and increases the likelihood of backers turning into buyers.
Milestone #4: Your advertising campaign
Once you have your Reservation Funnel, you’ll have to send traffic to build your prelaunch email list. The best way to do that is with advertising, primarily through Meta (Facebook/Instagram).
Meta advertising is a dependable, cost-effective, and scalable method for building an email list. The main elements of a successful Meta ad campaign include targeting the right audience, creating attention-grabbing imagery, and writing engaging copy.
Here are the elements in greater detail:
- Getting Targeting Right: Targeting the right audience is crucial, and Meta provides extensive targeting options. To simplify the process, create a “Dream 20” list, which includes 20 brands, organizations, or communities that you’d want to promote your product. This list helps you identify interests and target audiences effectively.
- Interest Audiences: You can build Interest Audiences based on the Dream 20 list and Meta’s suggestions. It is important to refine your audiences by excluding irrelevant interests and narrowing them down for better targeting.
- Lookalike Audiences: These are built using existing audiences or email lists as a seed audience. Lookalike Audiences are considered some of the best-performing audiences.
- Creating Your Ad Imagery: The emphasis is on using simple, authentic-looking imagery for ads. Examples include testimonials, founder walkthroughs, and static images with a red arrow pointing to the product. The key is to avoid looking overly promotional.
- Writing Your Ad Copy: The top text section and bottom headline of your ad copy are crucial. The advice is to keep the copy product-focused rather than brand-focused.
- Measuring Success: The two most important metrics to measure success are the cost per reservation (cost per purchase) and cost per lead. These metrics allow you to predict whether your ads will be profitable. Based on these metrics, a spreadsheet can help you calculate expected revenue and return on ad spend (ROAS).
- Applying the Model: The model helps you analyze the performance of different ad variations and audiences. You can refine your product positioning and build a qualified prelaunch email list by systematically testing different ads.
Milestone #5: Your campaign page
Your campaign page is a vital marketing asset that everyone will see upon your launch. It should feature an exceptional design that blends persuasive copywriting, captivating visuals, and storytelling.
Here’s how:
- Writing persuasive copy: Before diving into visual design, start with compelling copywriting. If your copywriting skills are limited, consider seeking help. Research successful campaigns on Kickstarter similar to yours for inspiration and structure.
- Be clear, not clever: Prioritize clarity in your copywriting. Begin with headlines to convey the most crucial aspects of your product. People tend to skim pages, so make sure your headlines provide clear benefits.
- Creating the visuals: Kickstarter and Indiegogo offer built-in page editors. Still, you’ll need to develop visuals outside of these platforms. Canva, a free and powerful tool, is recommended for design. Templates are available in the Campaign Page Template resource.
Here are some design tips:
- Use feature clouds: Showcase core features in a “feature cloud” graphic.
- Utilize GIFs: Create GIFs to demonstrate your product in action.
- Headlines & subheadlines as images: Design headlines and subheadlines as images for consistency.
- Bold & italicize text: Use the platform’s editors to emphasize important text.
Remember not to reinvent the wheel; instead, draw inspiration from successful Kickstarter projects, use provided templates and examples, and incorporate your best-performing copy from the Reservation Funnel. Following these steps, you’ll create a compelling campaign page.
Milestone #6: The campaign video
The Campaign Video plays a pivotal role in your crowdfunding campaign’s success. It can significantly impact your campaign’s performance if done correctly. However, it’s essential to strike a balance between its importance and not overspending or delaying your campaign because of it.
Consider the following:
- Your budget: While the Campaign Video is crucial, it doesn’t need to break the bank. It’s rare to spend over $15,000, and most can get it done for less.
- The script: Begin with a compelling script. It should start with a hook, addressing the problem or pain point, and introducing your product as the solution. Explain the product’s setup process, key features, benefits, and use cases, and offer a closing summary. End with a strong call to action.
- Shooting & editing: If you shoot the video yourself, you don’t need expensive equipment; an iPhone can suffice. Shoot horizontally, avoid zooming, edit on your computer, use a tripod or stabilization, and invest in a good microphone for clear audio.
- Hire a professional: If you prefer professional quality, hire an agency. To control costs, write the script beforehand. Limit the shoot to one location and aim to complete it in a day.
Milestone #7: Launch your campaign
Finally, the day you’ve eagerly awaited is here –you hit the launch button and become a crowdfunded creator.
Your prelaunch preparations should set the stage for rapid funding in the first 24 hours, a phenomenon we call “having a LaunchBoom,” and it looks something like this:
- Pressing the launch button: This step can be nerve-wracking but exhilarating. Double-check critical campaign elements like duration and funding goals, as these can’t be changed once live. Once confirmed, go ahead and launch, giving you time to share it with friends and family before starting broader marketing efforts.
- Emailing your community: Your prelaunch email list should drive revenue in the campaign’s first 24 hours. This list represents an essential part of your ad budget investment. Understand that not everyone on your list will convert, and conversion rates may vary based on your product’s price point. Focus on an aggressive email strategy during the first week, a high-converting period. Afterward, consider holding off on emails until the final campaign week.
- Email people one-to-one: Leverage direct communication with individuals who responded to your automated emails during the prelaunch. Personalized emails are more likely to be read, bypassing promotional filters.
- Meta advertising: Implement Meta Advertising in three phases: Remarketing to drive early ROI, leveraging best-performing prelaunch audiences, and emphasizing urgency as the campaign’s end approaches.
Now you’re launched!
Your product is now live, and if you’ve followed the system meticulously, you likely have hit your funding goal in the first 24 hours, but the work isn’t over.
There is still so much to do.
The crowdfunding live campaign timeline
After launching your crowdfunding campaign, the work is far from over. To maintain engagement and ensure the success of your project, there are several key steps to follow during the campaign’s live phase:
- Campaign updates: These are broadcast messages sent through the crowdfunding platform to all backers simultaneously. Campaign updates serve several crucial purposes:
- Communication: They provide an effective way to communicate with all your backers simultaneously.
- Cross-promotions: Updates can include cross-promotions, introducing your campaign to a wider audience.
- Engagement: Consistent updates keep your community engaged and build trust.
- Limit your updates to a maximum of once weekly during the campaign, as excessive updates can lead to canceled pledges. Avoid sending any updates during the final week to prevent potential cancellations.
- Share information relevant to your campaign, such as hitting funding goals, announcing stretch goals, and discussing campaign milestones.
- Stretch goals: Stretch goals are unique to crowdfunding and offer additional benefits that unlock as the campaign reaches specific funding milestones. While not mandatory, they can be a fun way to engage and reward your backers. Stretch goals can be creative and tailored to your campaign.
- Comments: Backers can leave public comments on your campaign page. Engage with comments professionally and promptly, as potential backers often read comments for insights and assurance. Addressing concerns and questions can lead to a more successful campaign.
- Engaging With Your Backers: Consistent and meaningful communication with backers is crucial. Neglecting to engage with backers can lead to canceled pledges and hinder campaign success. Ensure you maintain an open line of communication throughout the campaign.
- Cross Promotions: Cross promotions involve collaborating with other live campaigns on Kickstarter to promote each other’s projects. This strategy can be highly effective and cost-efficient, leveraging email marketing and third-party endorsements to reach a qualified audience. Here’s how to execute cross-promotions on Kickstarter:
- Research: Identify campaigns that align with your target market, share similar demographics, and have comparable backer counts.
- Reach out: Send a message to the campaign creators expressing your interest in a cross-promotion. Use a friendly and concise template to propose the idea.
- Final emails: In the last week of your campaign, maintain a sense of urgency to encourage backers to take action. Send three emails to your entire email list segmented by VIP and non-VIP. The emails should remind backers of the campaign’s end date and emphasize the urgency of backing before the campaign concludes.
- Email #1 – One week left: Announce the campaign’s end date and time, highlighting the urgency to back the project.
- Email #2 – Final morning: Remind backers that the campaign ends at midnight, emphasizing the last chance to secure early bird discounts.
- Email #3 – Final evening: Apologize for the additional email but stress that this is the final reminder before the campaign’s end, emphasizing the limited-time offer.
- Meta Advertising: During the final week, focus on Phase 3 advertising, which centers on urgency. Target remarketing audiences, including VIP and non-VIP email lists, visitors who added items to their cart but didn’t purchase, and web traffic from the campaign page. Craft ad copy and creative that emphasize the campaign’s imminent end and the need to act quickly.
As you wrap up the live phase of your campaign, remember that the next stage involves turning your crowdfunding success into a reality by manufacturing and delivering your product to backers.
Congratulations on achieving this milestone; you’ve become part of the minority of campaigns that succeed in crowdfunding.
The crowdfunding post-campaign timeline
The post-campaign timeline is a critical phase in the crowdfunding journey. It encompasses several key aspects, including what to do if your campaign fails, when and how you’ll receive your funds, managing failed credit card payments, extending your campaign through InDemand, and the importance of pledge management.
Dealing with failure
Sometimes, despite your best efforts, a crowdfunding campaign might not reach its funding goal. However, this isn’t necessarily the end of the road. The stories of Simon and Igor demonstrate that failure can be a stepping stone to success. They learned from their initial failures, adjusted their strategies, and eventually launched successful campaigns.
Getting Paid
Once your campaign is successfully funded, you’ll be eager to receive the funds to start production. On Indiegogo, funds (minus fees) are transferred to your bank account 15 days after the campaign ends. Kickstarter follows a similar timeline, transferring funds 14 days after the campaign ends. Remember that Kickstarter holds 5% of funds in reserve for at least six months if you raise over a certain amount in your currency.
Managing Failed Credit Card Payments
Managing failed credit card payments is a crucial post-campaign task. Kickstarter backers’ cards are charged when the campaign ends, and a percentage may fail to charge. That can be due to various reasons, including insufficient funds or fraud protection. On Kickstarter, backers have one week to fix their credit card issues, and after seven days, they become dropped backers. Money is transferred 14 days after the campaign ends.
A key strategy to reverse failed credit card payments is sending personal messages to backers with payment issues. You can contact them to remind them to update their credit card information before they become dropped backers. This proactive approach can save many errored backers from being lost.
Indiegogo InDemand
Indiegogo InDemand allows you to continue pre-selling your product after your Kickstarter or Indiegogo campaign ends. It operates as a pre-order store, keeping the campaign momentum alive. It’s worth considering, especially if you’ve had a successful Kickstarter campaign. The funds raised during your Kickstarter campaign are automatically carried over to your InDemand campaign.
Pledge Management
Pledge management is an essential part of the post-campaign process. It involves collecting key backer information needed for fulfillment, including shipping details, product variants, and add-ons. Both Kickstarter and Indiegogo have native pledge management options. You can also use third-party pledge managers like BackerKit or PledgeBox, which offer more advanced features like upselling and shipping information collection.
Each post-campaign step is critical in ensuring the success of your crowdfunding project and delivering a satisfying experience to your backers.
Crowdfunding timeline FAQs
Here are some of the most frequently asked questions regarding the crowdfunding timeline:
How long does a crowdfunding campaign take?
A crowdfunding campaign typically lasts 30-60 days.
Here are some of the factors that can affect the length of a crowdfunding campaign:
- The type of project: Projects that need to raise a lot of money or have a significant manufacturing process may require a longer campaign.
- The platform: Different crowdfunding platforms have different requirements for campaign length.
- The target audience: The audience’s attention span and willingness to commit to a campaign can also affect its length.
Ultimately, the length of a crowdfunding campaign is up to the project creator. However, it is important to consider all the factors involved to ensure the campaign succeeds.
The crowdfunding timeline: final thoughts
The crowdfunding experience will vary from creator to creator. Still, the timeline outlined in this article is the comprehensive journey from idea to launch to the critical post-launch and post-campaign phases that every creator should make to ensure success.
By the end of 2022, crowdfunding platforms like Kickstarter and Indiegogo had collectively raised over $10 billion for new product launches, making crowdfunding an attractive option for product creators. Crowdfunding offers a lower-risk approach to product launches, allowing creators to generate revenue without inventory, validate demand, and tap into a community of early adopters.
The seven key milestones in LaunchBoom’s Product Idea To Crowdfunded framework include product positioning, product photography, the reservation funnel, your advertising campaign, your campaign page, the campaign video, and the campaign launch itself. Each milestone is crucial for building a successful crowdfunding campaign, from creating effective product positioning to crafting compelling visuals and videos.
Maintaining engagement through campaign updates, stretch goals, and consistent communication with backers is vital post-launch. Cross-promotions with other campaigns can help expand your reach, and well-timed emails and Meta advertising can drive the campaign to success.
After a successful campaign, understanding fund disbursement, managing failed credit card payments, considering InDemand, and effective pledge management are critical steps to ensure the project’s success.
Use this comprehensive guide to navigate the entire crowdfunding process, from inception to post-campaign fulfillment, as it will provide a roadmap to achieve crowdfunding success, and, as always, if you need our help, LaunchBoom will be here for you!