If you want one guide to show you everything you need to launch a successful Kickstarter this year, you came to the right place.
Because for the last 10 years, I’ve helped over 1,000 product creators raise over $175 million with crowdfunding. And in this article, I’m going to share everything you must know to make your Kickstarter a success.
You’ll learn how to find your superfan, how to run Meta ads, even how to get funded on the very first day, and a lot more… All organized into 17 simple steps that even a complete beginner can follow.
This system has been used by creators from all different product categories, with all different budgets, and at all different stages of business. So whether you have a tabletop game, tech product, glamping project or anything in between, follow these 17 steps and you will have a successful Kickstarter launch this year.
And if video is more your style, I also created this video to go along with the article:
Contents
- Key Takeaways
- Step 1: Position Your Product
- Step 2: Capture Product Imagery
- Step 3: Build a Reservation Funnel
- Step 4: Set Up Email Marketing
- Step 5: Drive Traffic With Meta Ads
- Step 6: Build Your Campaign Page
- Step 7: Create Your Campaign Video
- Step 8: Choose Rewards & Pricing
- Step 9: Set Your Funding Goal
- Step 10: Choose Your Launch Date
- Step 11: Launch (and get funded)
- Step 12: Drive More Traffic with Meta Ads
- Step 13: Use PR & Influencer Marketing
- Step 14: Boost Your Campaign
- Step 15: Finish Your Campaign Strong
- Step 16: Set Up Late Pledges
- Step 17: Use a Pledge Manager
- Follow These Steps to Launch a Successful Kickstarter
- How to Launch a Successful Kickstarter Campaign: Frequently Asked Questions
Key Takeaways
- Good product positioning is crucial – it can mean the difference between a failed and successful campaign (as shown by Audrey’s Kublet case study).
- Building a reservation funnel with $1 deposits identifies serious potential backers – someone who puts down a $1 deposit is 30 times more likely to buy than someone who only gives their email.
- Launch on Tuesdays between 7-10 AM EST for optimal results, and avoid launching in December or November.
- Your pre-launch email list is the key to getting funded on the first day – this initial momentum boosts your Kickstarter visibility.
- Use Meta ads strategically in both pre-launch and during your campaign to target your “superfans” and drive consistent traffic.
Step 1: Position Your Product
In August of 2022, Audrey launched her first Kickstarter campaign called Kublet. Unfortunately, it failed to get the funding she needed so she canceled it. And 8 months later, she re-launched the SAME exact product on Kickstarter. Only this time she raised over $150K.

So what was different?
Well, in the first failed campaign, Audrey positioned her product as “mini monitors for your desk.” And in the second successful campaign, Audrey positioned her product as “the ultimate simple yet powerful data tracker.”

She didn’t change her product in the 2nd campaign. She changed how she positioned her product. And that simple, yet powerful change of positioning was key in helping her raise 6 times more funding her second time around.
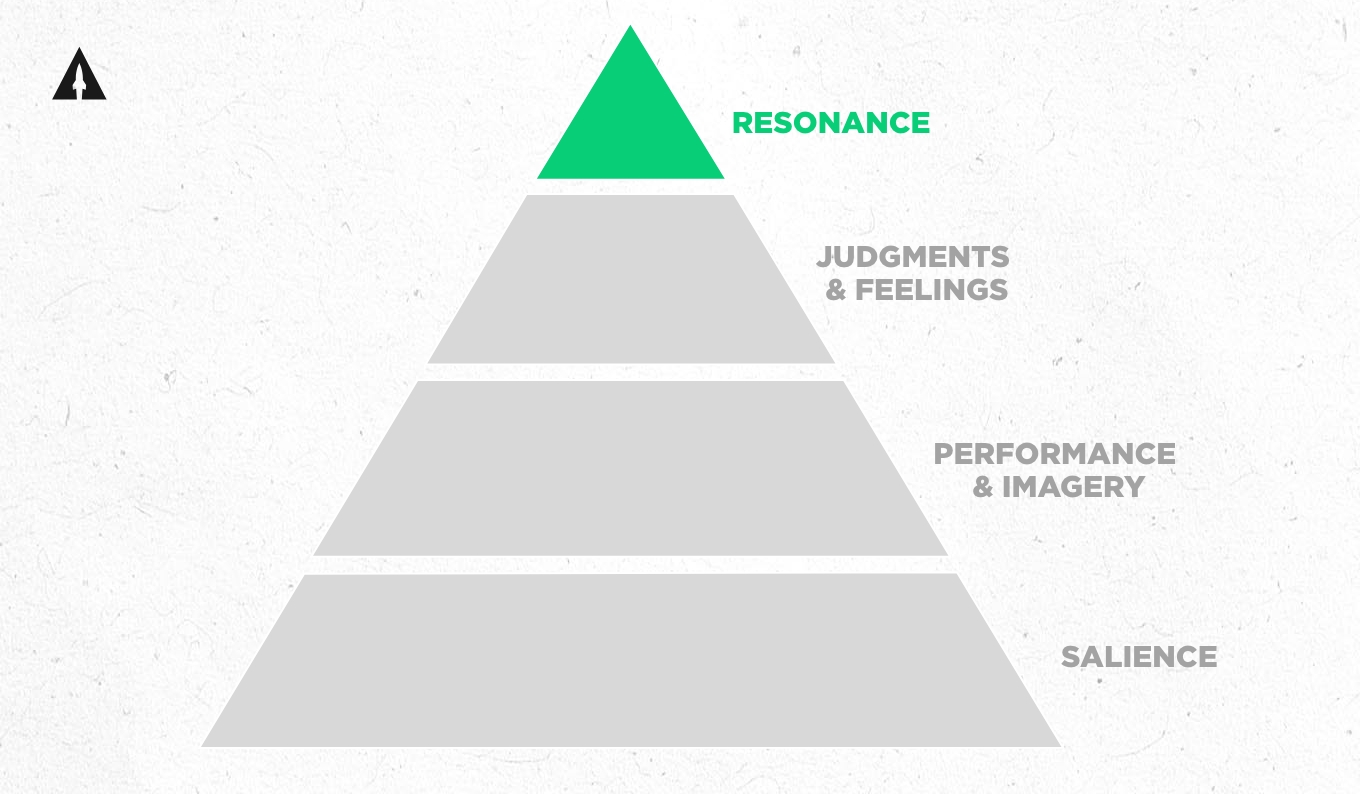
Good product positioning convinces your target customer that your product solves their problem. This is a lot easier to say than it is to do. But there’s a framework I like to use that will help you clarify your product positioning. It’s called the consumer based brand equity or CBBE framework. It has four different levels that will help any creator position their product to sell.
Level 1: Salience
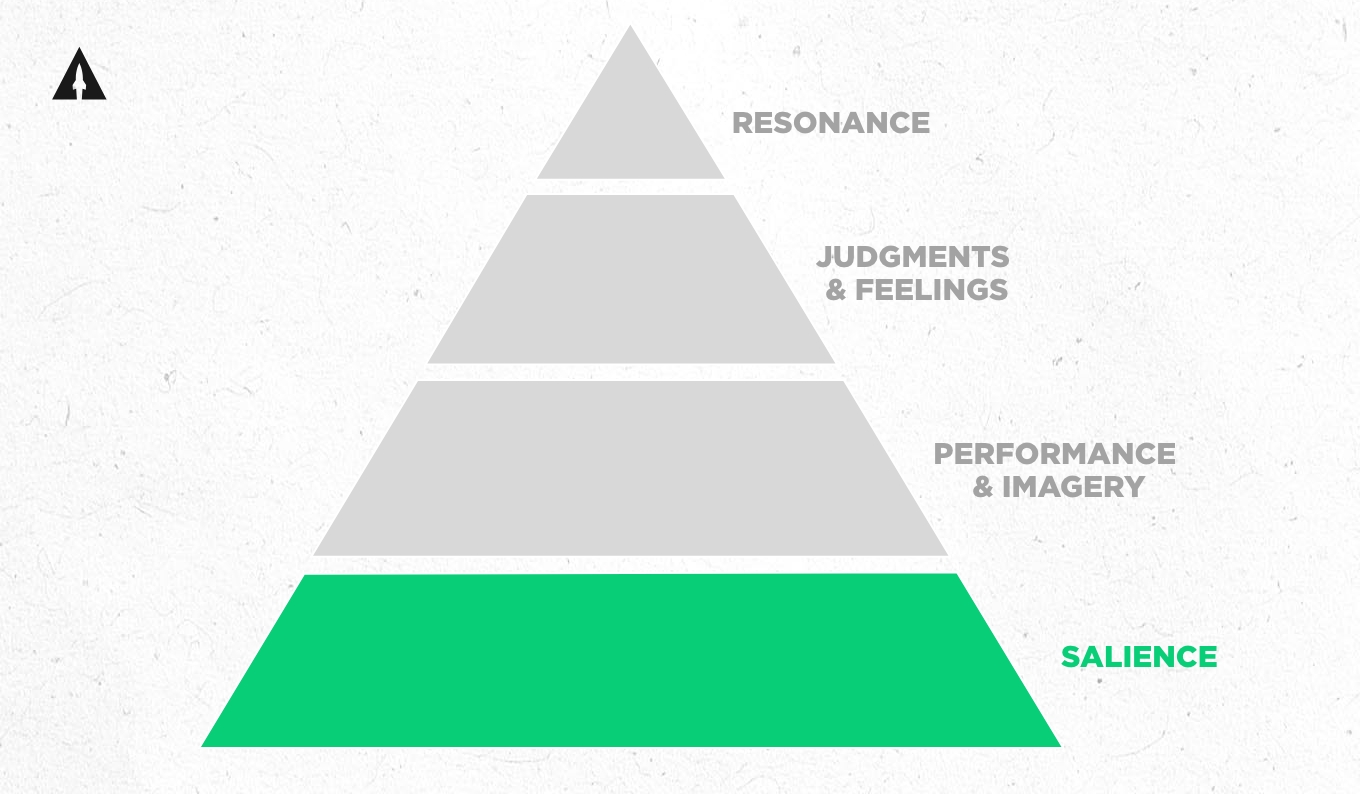
Starting at the base, we’ve got Salience. This is where you answer the big question: “What are you?”
But, here’s the key, you’ve got to keep it simple. What your product is and how it solves a problem, should be crystal clear. It’s like when someone asks what you do for a living – you wouldn’t say “I dabble in a multifaceted array of ventures.”
No one knows what that means! Instead you’d say something like, “I’m an engineer. I’m an accountant. Or I have a business that sells products online.”
When it comes to your product, you want to use words that your target audience understands.
For example, check out how our client, Chillshark, used simple, salient language to describe their product.
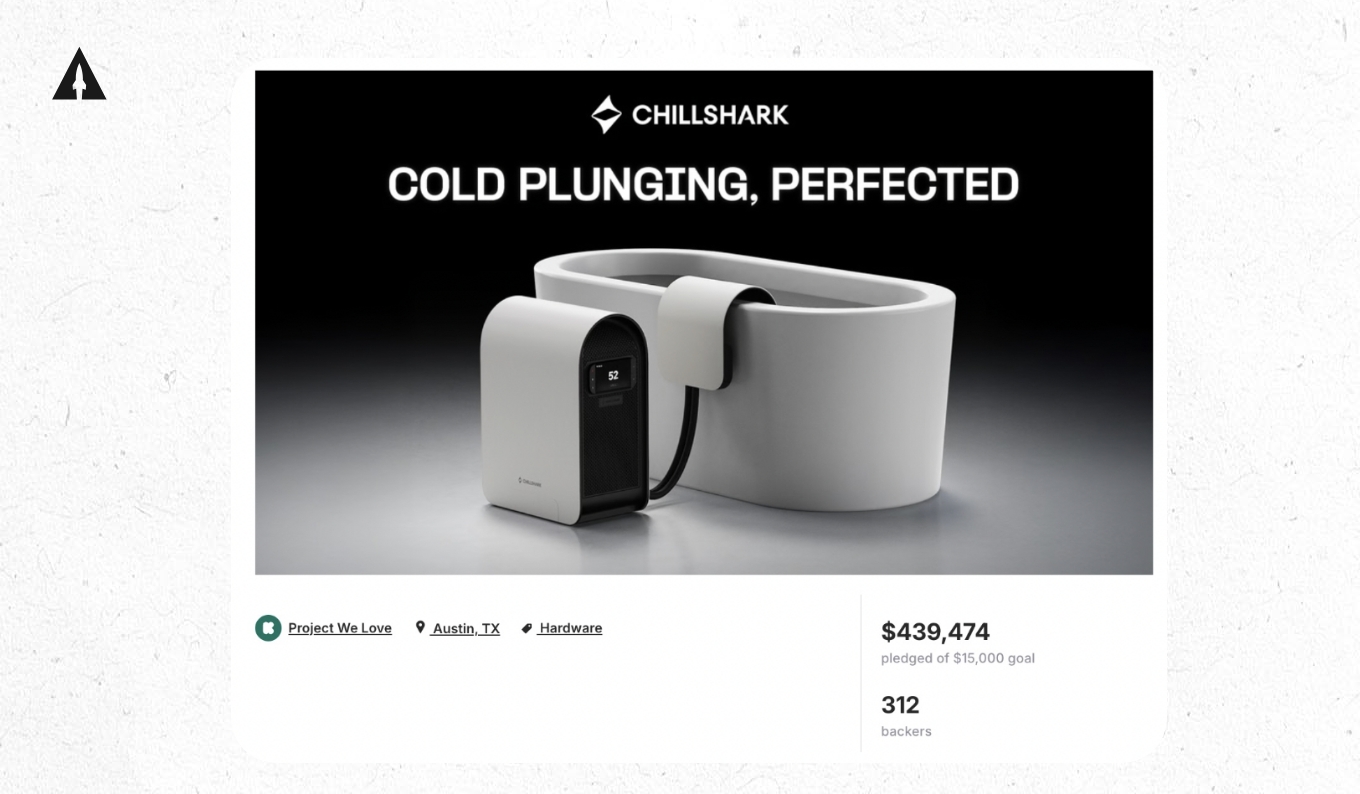
Their headline was: Chillshark: Your At-Home Cold Plunge Solution
They could have said: Chillshark: A cryotherapeutic immersion system engineered for optimal personal recovery in your living space.
Technically, both say the same thing. But you have to think way harder to understand the second version. Your goal is to dumb your language down as much as possible so your target audience understands your product ASAP.
So keep it simple and don’t overthink this part.
Level 2: Performance & Imagery
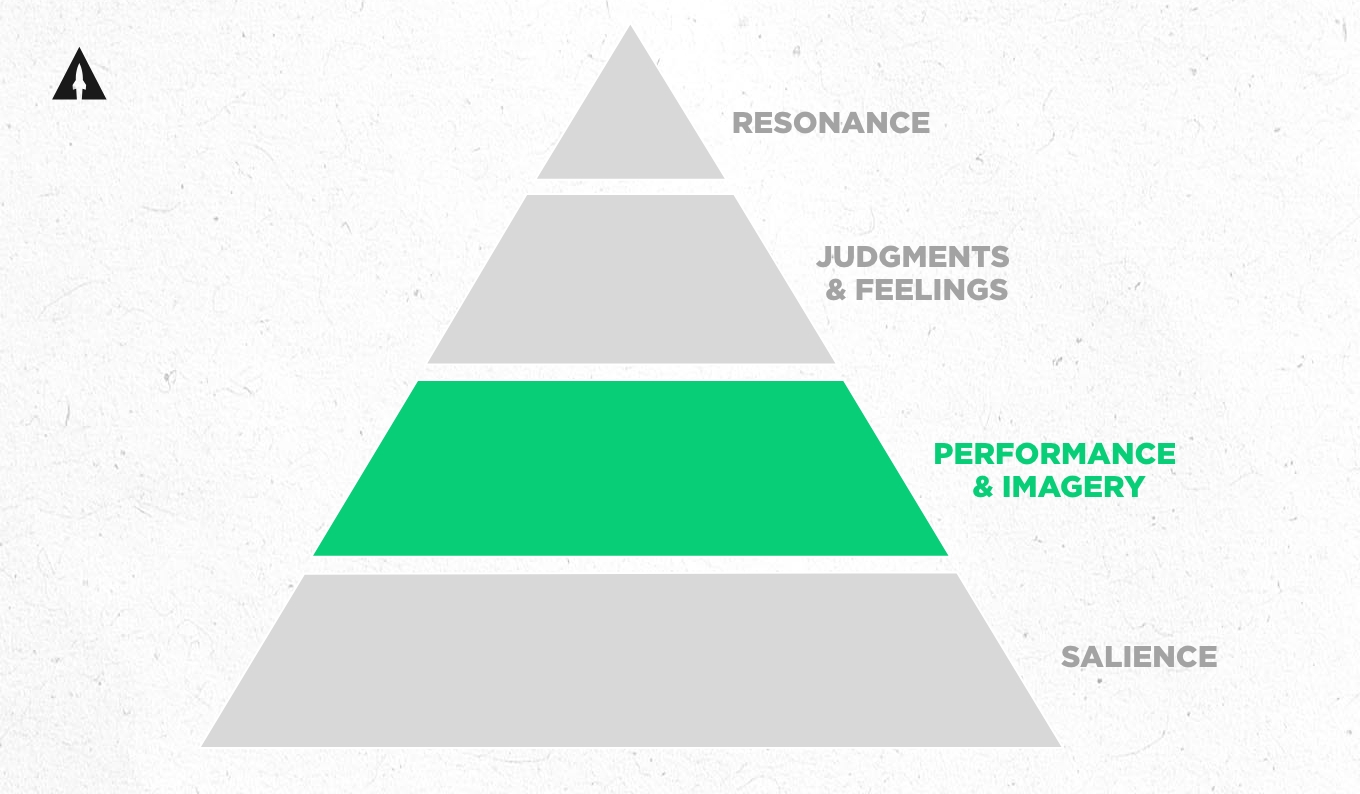
Moving up to Level 2, we’re talking Performance and Imagery. This is where you show off what makes your product truly special.
Let’s start with Performance. Performance is all about what your product does way better or different than the competition. Does it last 10x longer? Is it 50% the price? Is it a new and interesting theme for a board game? Don’t hold back here. This is one of those few times in life where it’s okay to brag.
Next we have imagery. This is like the setting where your product’s story takes place. Where will people use your product? Who will be using your product? How will they use your product? Paint that picture so your target audience can clearly see themselves using it.
Level 3: Judgments & Feelings
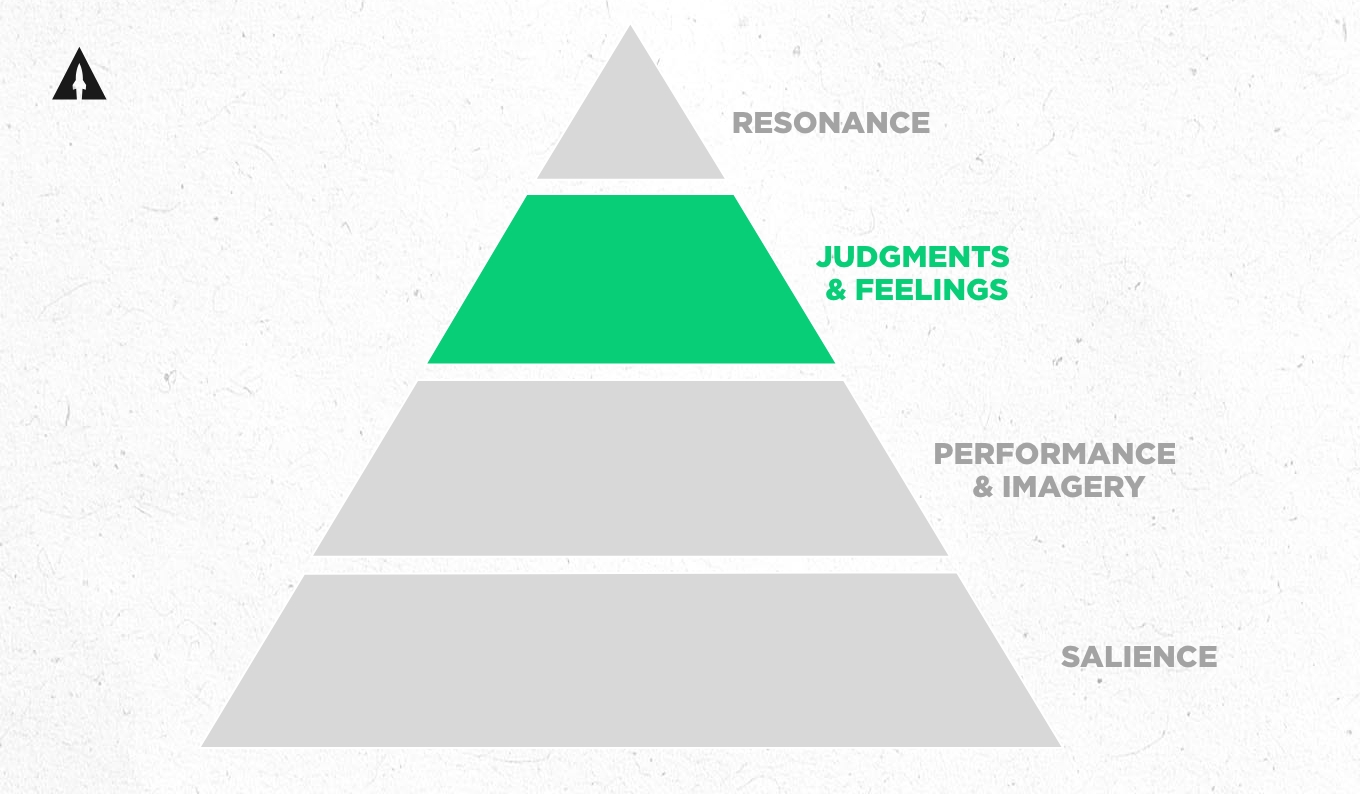
This is where people are asking, “How good are you, really?”
Starting with Judgments, you want to think about the doubts people will have about your product, and then get in front of those doubts.
For example, let’s look at our client iXi, a smart, self-driving golf trolley that raised $880,585.
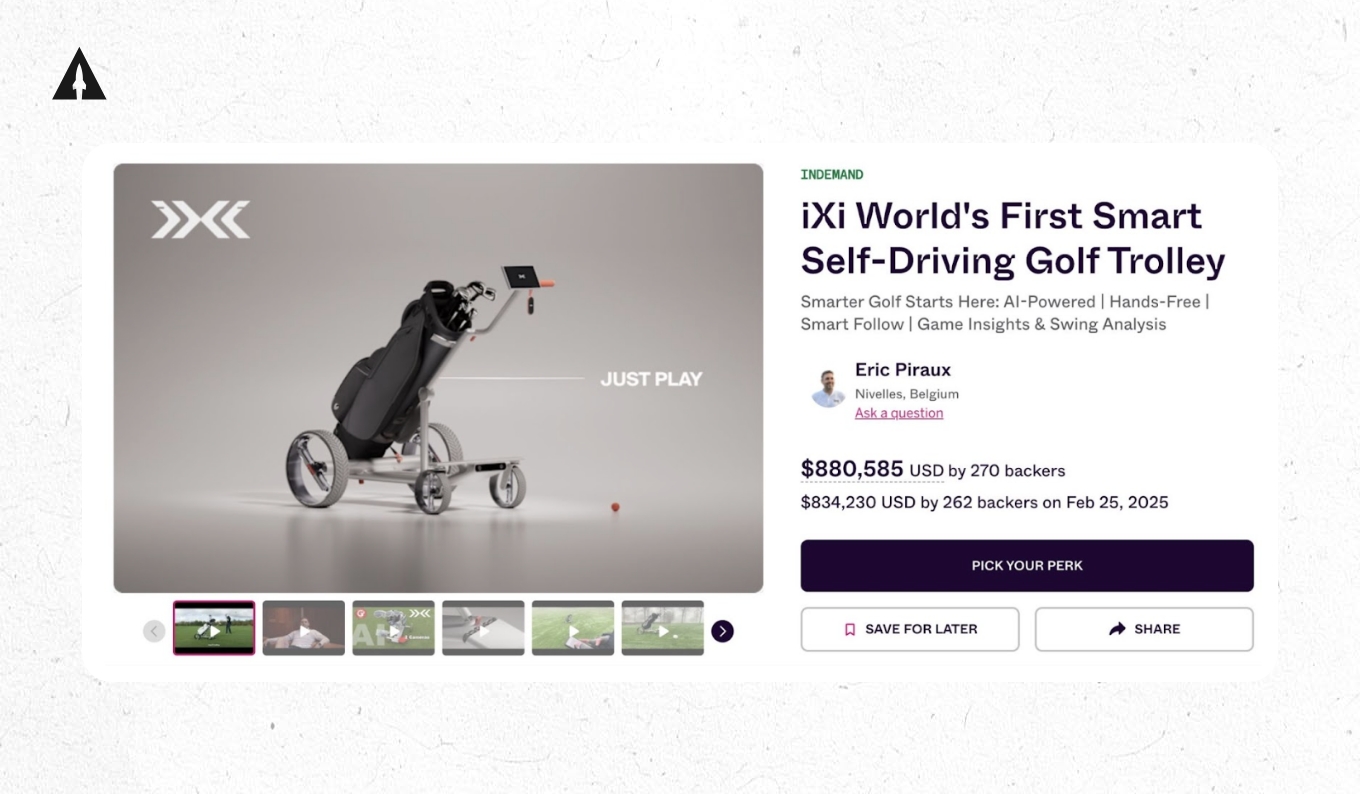
They knew that people would have the following doubts:
- Does it really follow you that well?
- Can it even go up hills at the golf course?
So they made sure to address those doubts directly on their campaign page.
They showed how it follows…
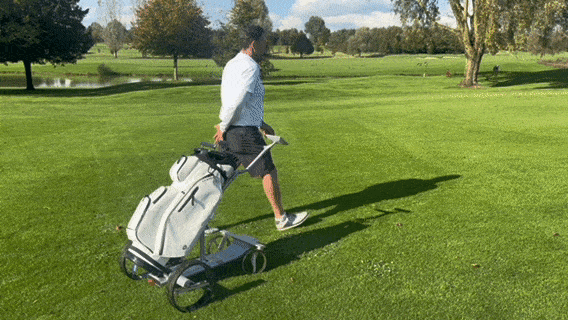
They showed how it can go up hills…

Now onto Feelings. This isn’t some “kumbaya” stuff I’m talking about. Instead, this is about identifying the emotions you want people to feel when experiencing your product. Are you going for fun and youthfulness? Or serious and professional?
For example, let’s compare the feelings you get from Xebec Snap and Wildelore, which are two LaunchBoom campaigns.
With a sleek white background and subtle zoom video editing, Xebec gives off innovative, professional, and cool vibes.

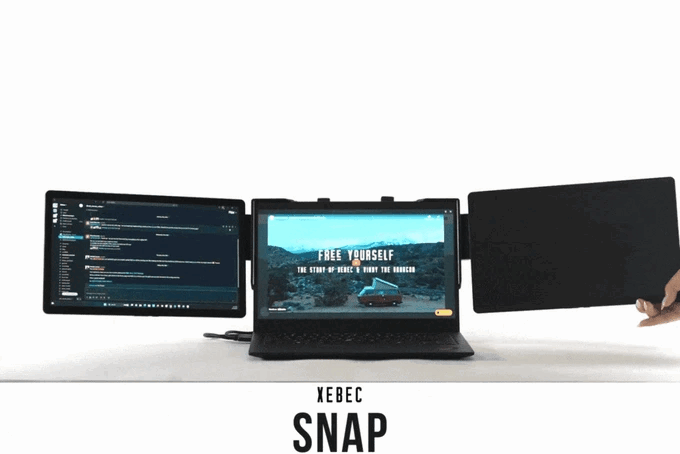
Wildelore on the other hand uses soft, warm colors to evoke feelings of love, support and connection.

As you can see, the feelings you choose will lead you to use different words and images in your marketing.
Level 4: Resonance
And at the peak of the pyramid? Resonance. This is the ‘What about you and me?’ moment. It’s where loyalty lives and where connections are cemented. You want customers to see your brand as a kindred spirit, with a shared mission and values.
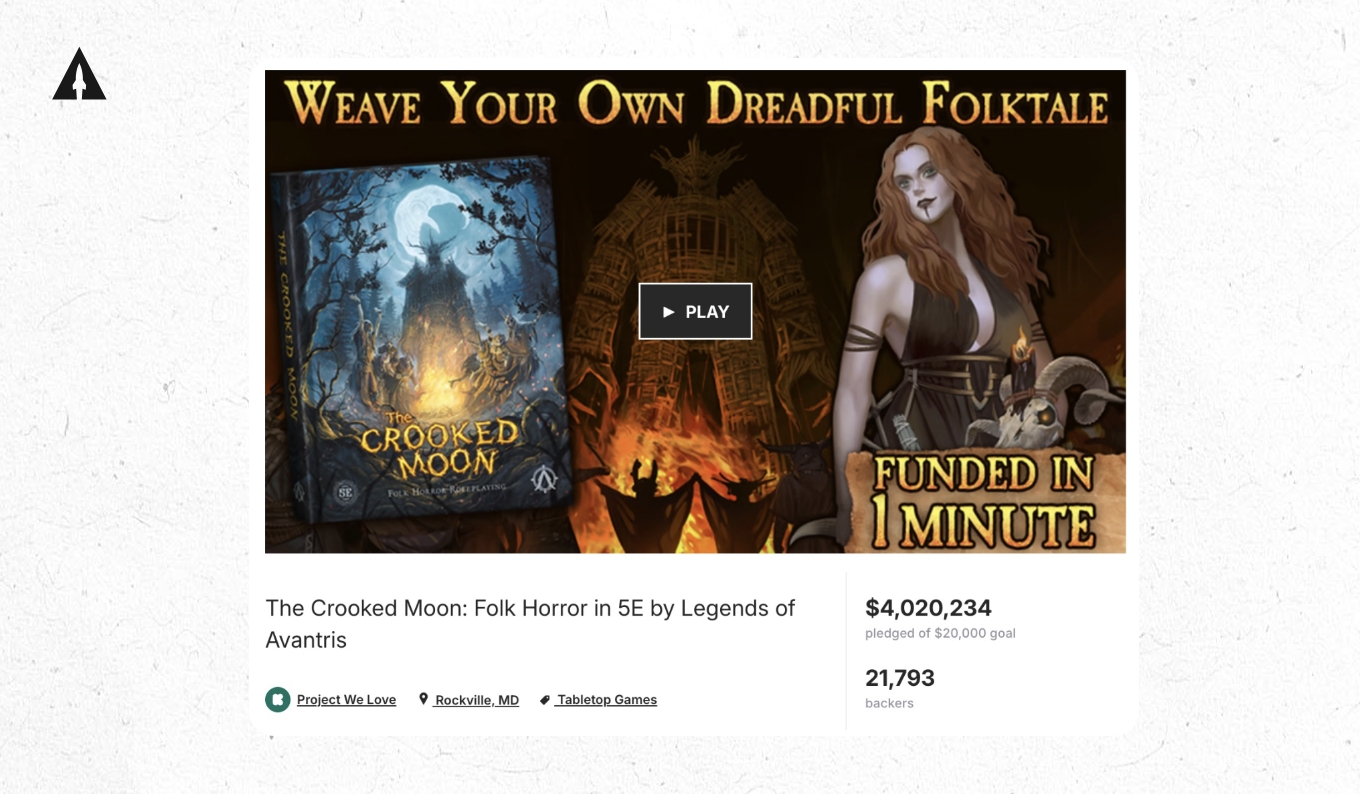
For example, one of the campaigns we helped launch recently was The Crooked Moon. It was created by 7 best friends who love dungeons and dragons. Including their story in their product positioning created connection (or resonance) between their customers and themselves. This is one of the reasons why they went on to raise over 4 million dollars and become the most funded D&D campaign ever on Kickstarter.
Use this CBBE Framework to position your product the right way. Once you do this, you’ll have an incredibly strong foundation to build the rest of your Kickstarter launch on top of.
Step 2: Capture Product Imagery
If a picture is worth a thousand words, then a good product image is worth a thousand backers. Because good visuals translate to instant appeal. And there are two main types of product imagery you can use to get there: photorealistic renderings and photography.
Photorealistic Renderings
First up, let’s talk about renderings. These are like the magic of Photoshop for your product. Renderings allow precise control over product appearance, materials, lighting, and environment. These can be a lifesaver if your prototype isn’t ready yet. All you have to do is find a 3D render artist on a site like Upwork and you can start your marketing while finalizing your physical prototype.
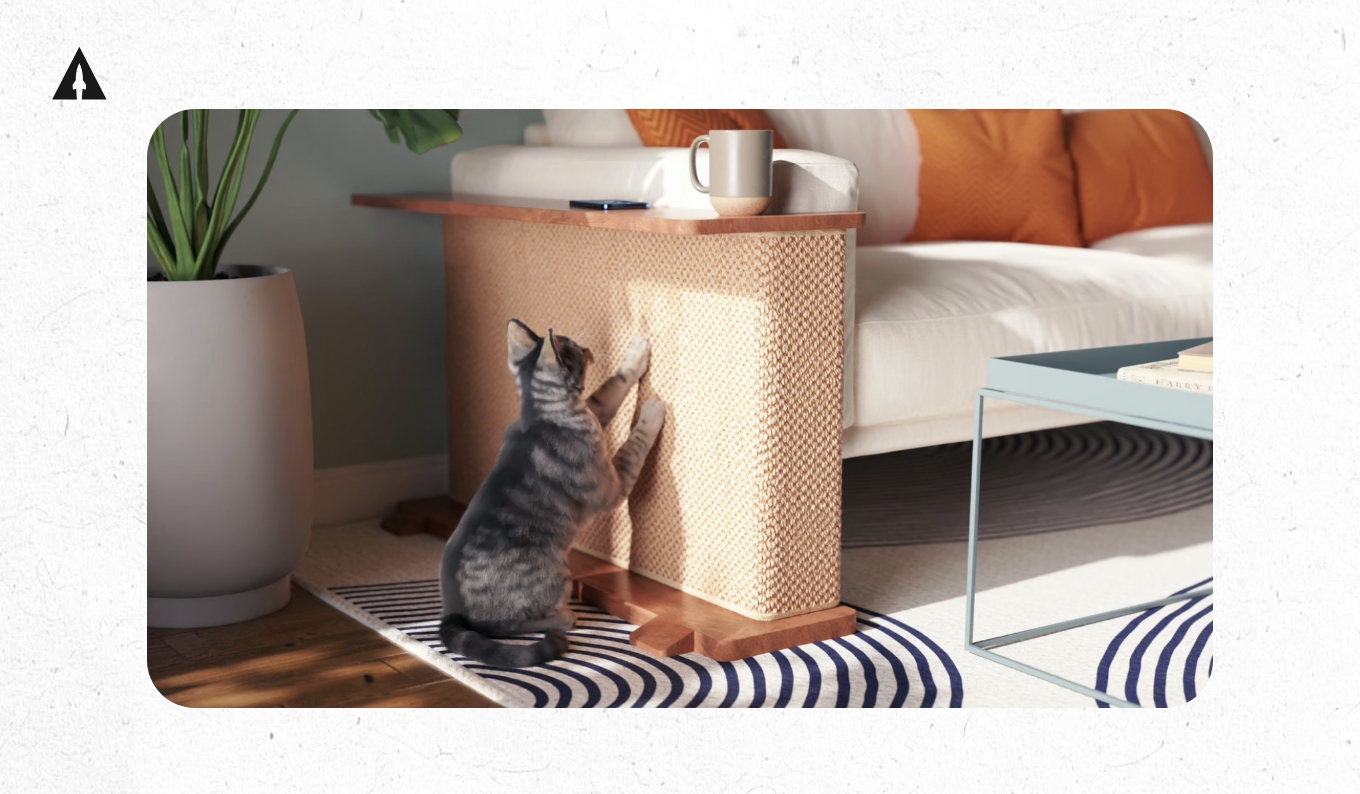
For example, take a look at this awesome photorealistic render our client, Jeremy Lightcap, created himself for his campaign called Cat-e-Corner which went on to raise $202,756
An important note though… Photorealistic renderings are not allowed on Kickstarter, but they can still be very useful in your marketing during the pre-launch.
Real Photos
Next, we’re talking about the real deal… product photography. You’ll want to get three types of product photos: studio photos, location photos, and action photos of your product.
Photo Type 1: Studio
Studio photos are like the glamor shots of your product. Throw your product on a white or colored backdrop, and highlight every angle and feature. For example, check out some of the studio shots from LaunchBoom Creator, Author Clock, who went on to raise over $1.3M on Kickstarter.
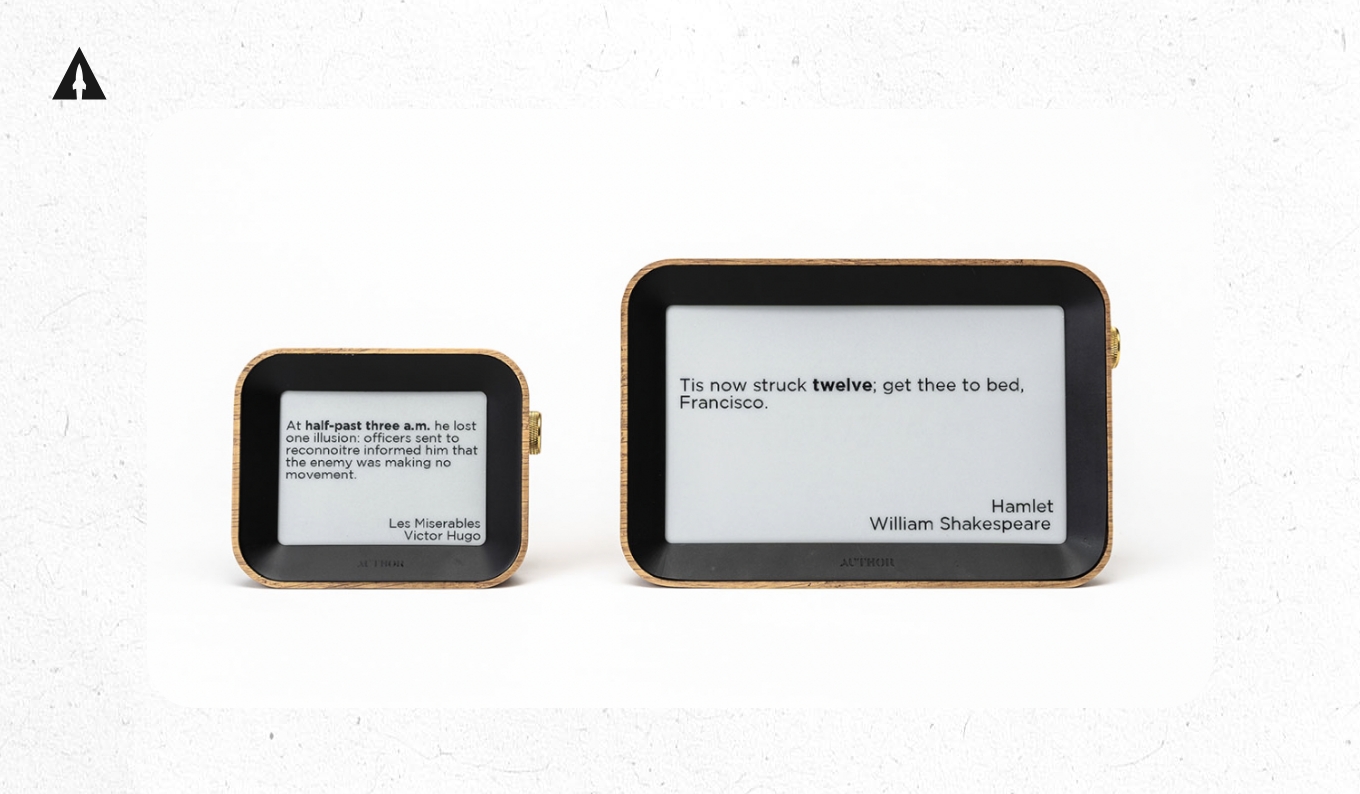
What you see here are the “straight on” shots, but we also recommend getting 45 degree angle, profile, and back studio shots.
Photo Type 2: Location
For location photos, you want to showcase your product where people would use it. Lucky for you, you already thought up all those locations during the “Imagery” section of the CBBE framework.
Let’s see the location shots for our campaign for The Top Shelf, which raised nearly 1.3 million Canadian dollars on Kickstarter. We showed off the bag in locations like the wilderness, a busy city and while working…
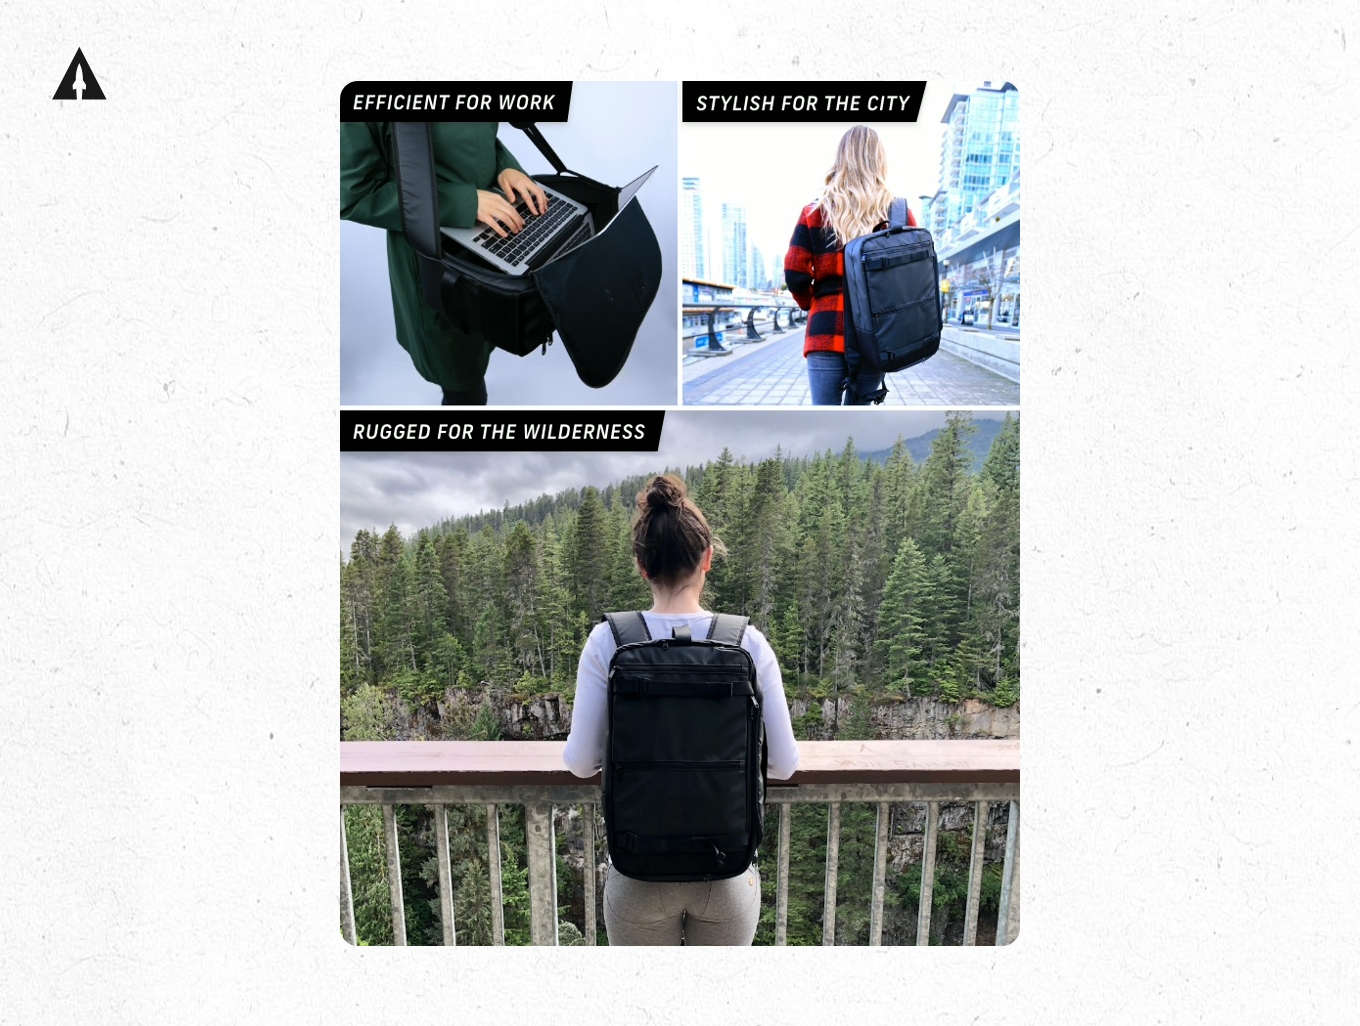
This way backers could visualize how they would use it.
Photo Type 3: Action
Now for action shots, you’ll want to use these to showcase product benefits better shown with motion or interaction. Focus on one specific action you’re trying to show and capture that in a photo.
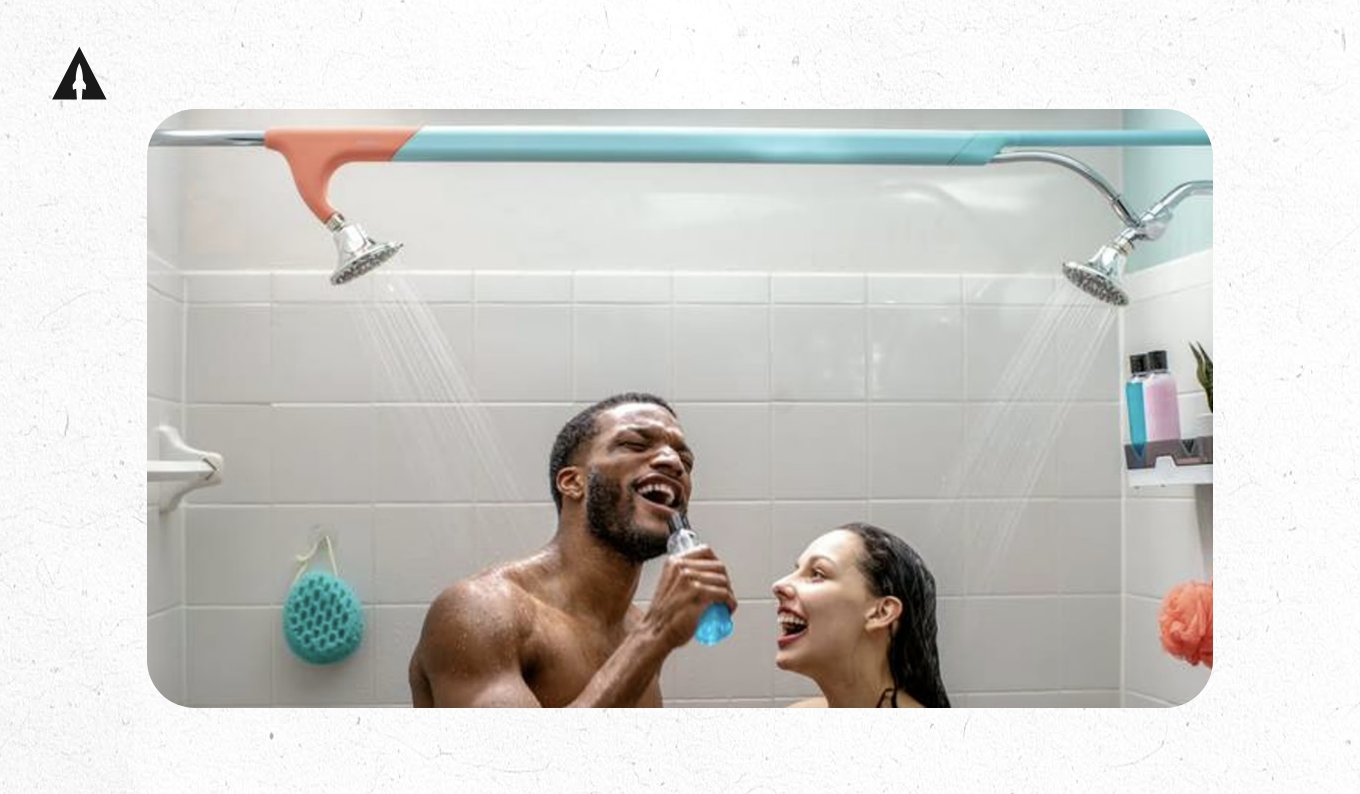
For example, here’s an action shot from our campaign for the Tandem Shower, which raised over $774K. It shows the action of a couple taking a shower together, which is the main benefit of the product.
But action shots aren’t limited to photos, they can be video too. Here’s one from the campaign for The Pepper Cannon, which raised over $1.1M. These show how the pepper cannon can grind a bunch of pepper super fast.
Step 3: Build a Reservation Funnel
So what in the world is a Reservation funnel?
Well, a Reservation Funnel is a way to collect email addresses and more importantly, $1 reservation deposits during the pre-launch. Those that put down a $1 deposit are rewarded with your best launch deal and we like to call them VIPs.
Here’s why this is so important. Without the $1 reservation, it’s virtually impossible to know how likely it is that someone on your email list will actually buy your product when you launch on Kickstarter. Which means it’s very easy to waste money on marketing building email lists when you don’t use a reservation funnel.
Instead, adding a special VIP offer (like a discounted add-on or guaranteed discount) that gets people to put down a small deposit in the pre-launch, lets you know who’s actually interested in buying.
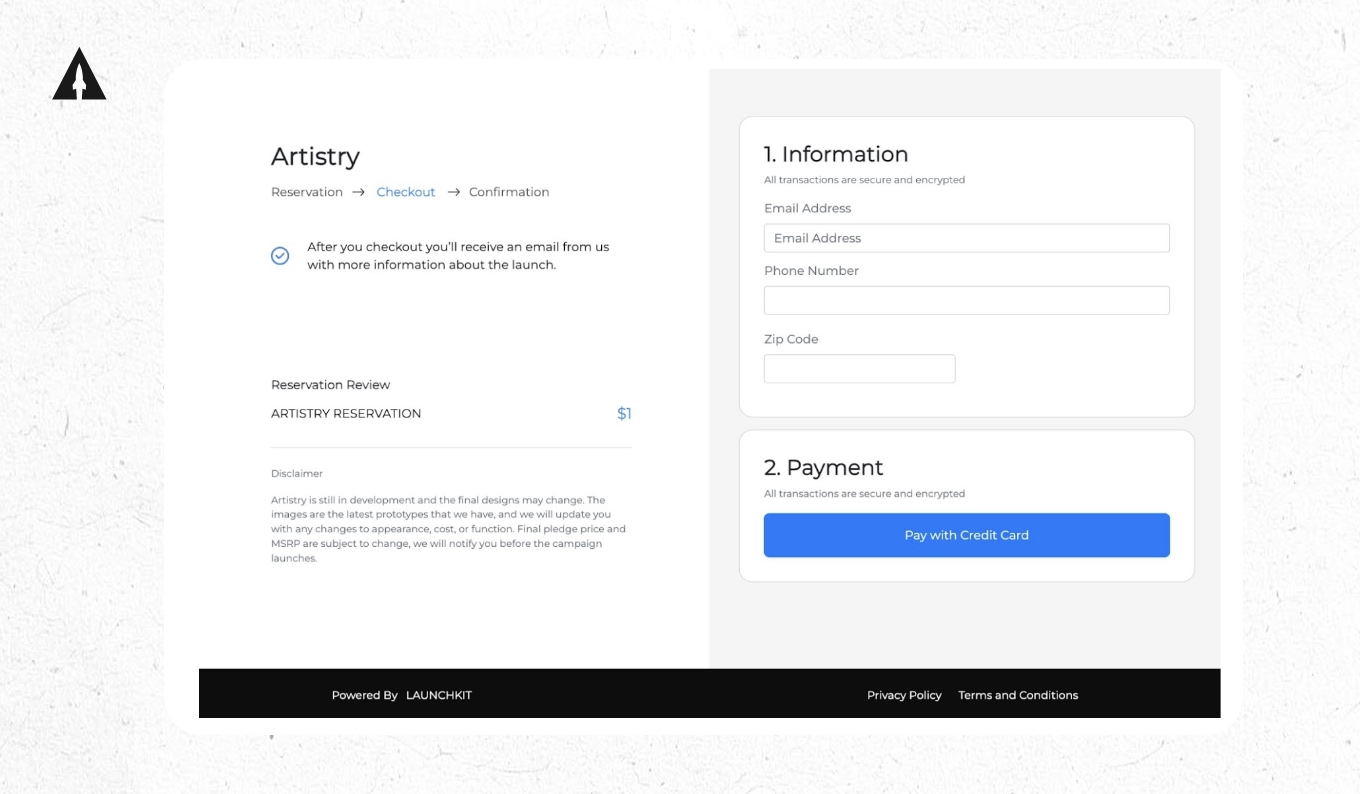
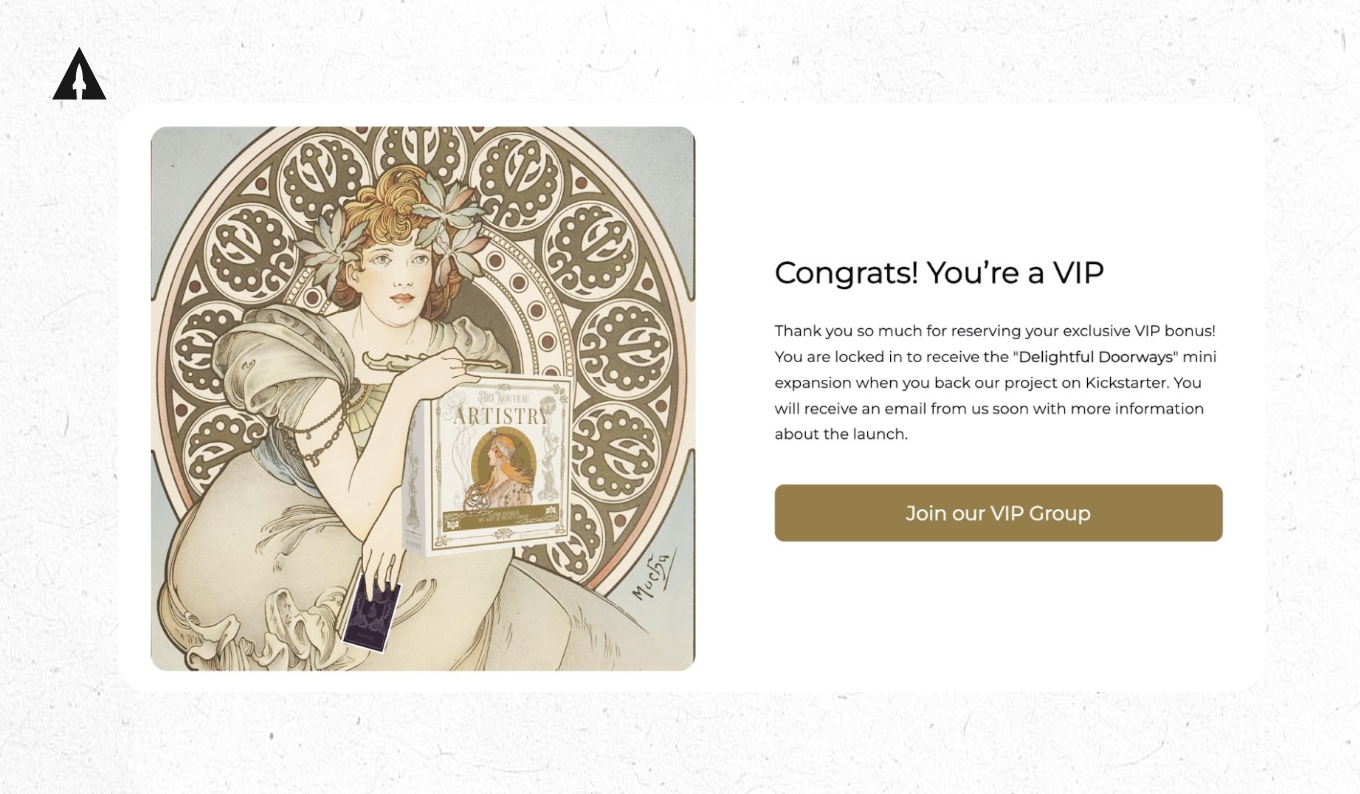
Now the steps in the Reservation Funnel are simple. I’ll show you how one of our clients Dusty used it for his campaign, ARTISTRY, which raised $736,673 on Kickstarter.
Reservation Funnel Step 1: Landing Page
First, create a landing page using the product positioning and product imagery you created in steps 1 and 2. The goal here is for someone to give you their email address.
Here was the landing page for ARTISTRY:
Reservation Funnel Step 2: Reservation Bridge
Next, show an exclusive VIP offer in exchange for a $1 reservation deposit.
ARTISTRY offered a mini-expansion called “Delightful Doorways” that had a retail value of $7.99 in exchange for $1.
Reservation Funnel Step 3: Checkout
After that, take them to a checkout page to put in their payment info.
Reservation Funnel Step 4: Thank You Page
Once they check out, lead them to a thank you page where they are invited to join an exclusive VIP community.
In the case of ARISTRY, they used a Facebook Group, but a Discord server can work too.
You might be thinking… is getting the $1 deposit really worth it? The short answer is: yes. And the data backs it up. We’ve found that on average, someone that puts down a $1 deposit is 30 times more likely to buy than someone that only gives their email address. That’s a huge difference… and not having enough VIPs can be the difference between failure and success for your Kickstarter.
Because here’s the thing, the pre-launch email list you’ll build with the Reservation Funnel, is going to allow you to hit your Kickstarter funding goal on the very first day. ARTISTRY used their pre-launch email list to blow past their 5 thousand dollar kickstarter goal, raising $167,177 in the first 24 hours.
Quick tip: the Reservation Funnel I showed you from ARTISTRY was created using LaunchKit – that’s the software we built at LaunchBoom that powers all of our launches.
Step 4: Set Up Email Marketing
Before you start building your pre-launch email list, you need to set up your email marketing strategy. That’s because it’s not enough to just talk with the people on your list, you need to talk with them the right way.
But before we get into the details about the exact emails you should send, you have to understand two important best practices of email marketing.
Best Practice #1: Limit Your Call-to-Actions (CTAs)
Every email you send should call the reader to take an action – in the marketing world, we aptly call this a “call to action” or CTA. Think of it as guiding the people on your list down a path that takes them closer to becoming a backer.
For example, a great call to action is for someone on your email list to upgrade to VIP for $1. Ideally you only have one call to action per email to keep it focused.
Best Practice #2: Quality Over Quantity
Nobody likes getting a bunch of emails in their inbox everyday. And bombarding your list with a ton of emails is an easy way to hurt your open rates and see more unsubscribes. You want your pre-launch email list to be excited to back your project, not to be annoyed every time you pop in their inbox.
My advice is to keep things simple. There are two sequences of emails you’ll want to send:
- Welcome email sequence: a series of two emails that welcomes them to your pre-launch list once they first sign up.
- Launch announcement sequence: a series of two emails that are sent in the week before your launch.
That’s it. Don’t get tempted to send weekly updates to your subscribers. We’ve found that to be the quickest way to make people get frustrated and unsubscribe from your list. Instead, keep it simple, and only send the most impactful emails.
I’ll talk about the Launch Announcement Sequence later, for now, let’s talk about the Welcome Email Sequence.
Welcome Email Sequence: Non-VIP
Non-VIPs are the people on your email list that have shown interest, but haven’t put down a $1 deposit yet. You’ll want to create two emails in this sequence.
The first one will be sent to them right when they sign up for the list. You’ll want to thank them for signing up and include a call to action to upgrade to VIP for $1.
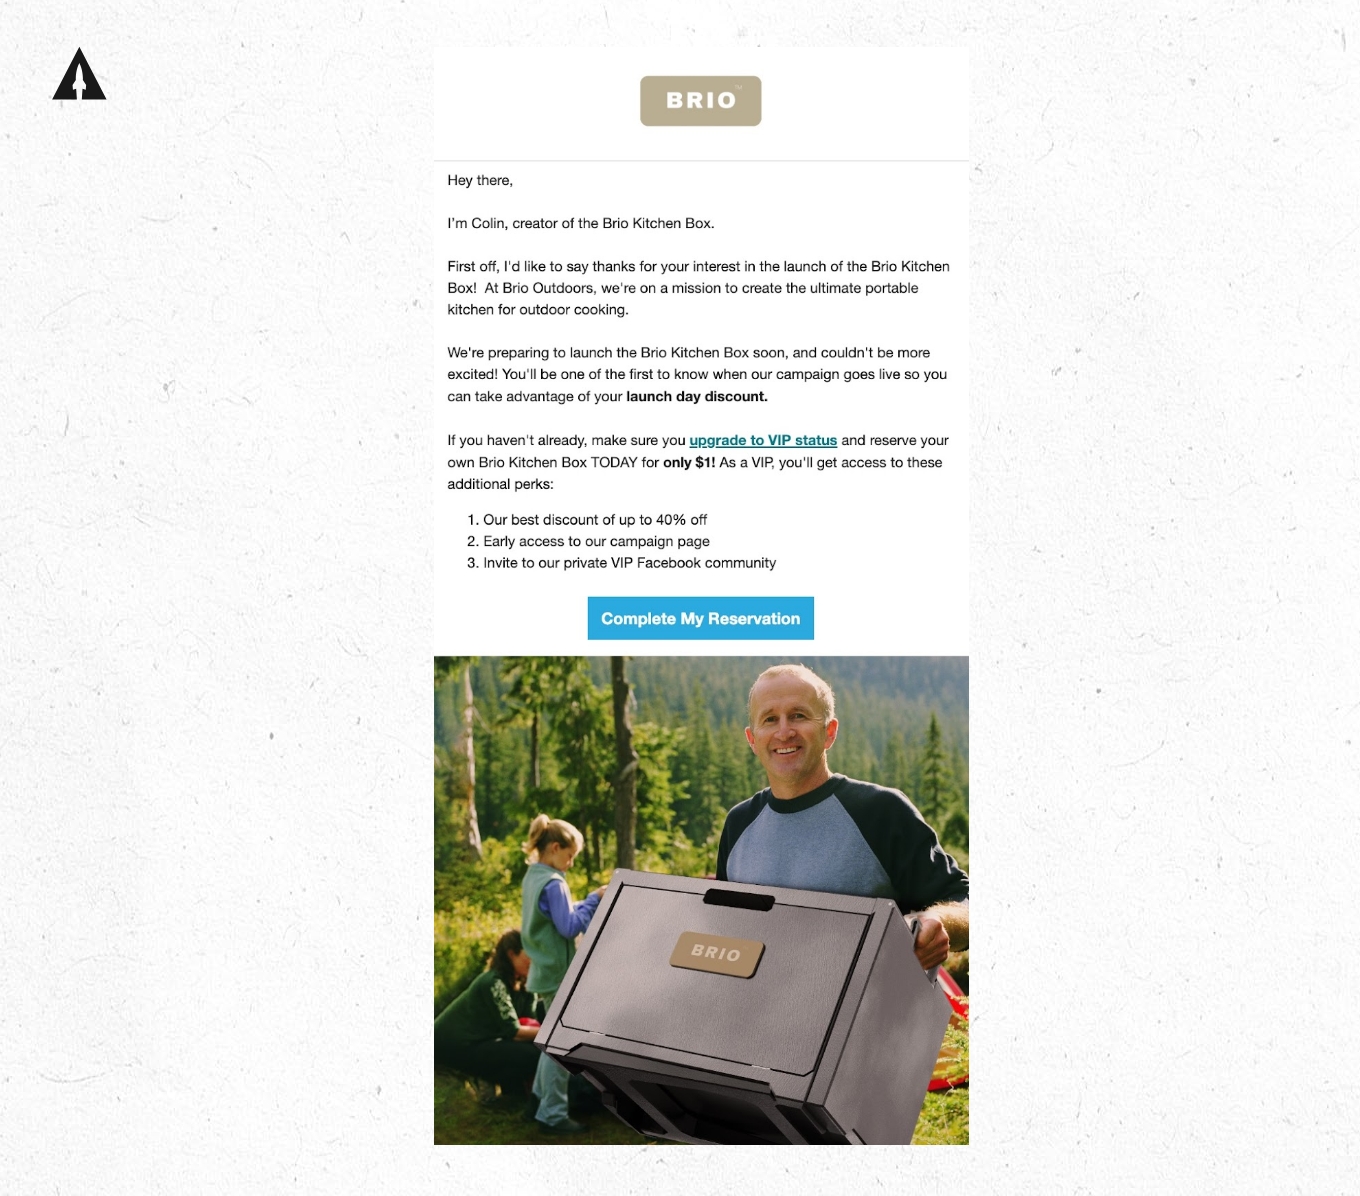
Here’s an example of the first welcome email from our client Brio Box who raised $224,690 on Kickstarter:
Next, you’ll want to add a second email to the sequence. This will be sent one day after the first and focus on (1) trying to get them to engage by answering a question and (2) upgrading to VIP for $1.
Welcome Email Sequence: VIP
VIPs are the most excited about your project. Calls to action here are focused on giving them more ways to stay up to date with your campaign.
The first email in the welcome sequence should be triggered when they put down the $1 deposit. Because they already have upgraded to VIP, I recommend either inviting them to follow your Kickstarter page or to join a VIP community where they can interact with you and other VIPs.
Now the second email is pretty similar to the Non-VIP email. Ask them a question and then use the same call to action as your previous email.
Now that you know which emails to send, you’ll need to get them set up in an email marketing platform. There are many to choose from, like Mailerlite or Klaviyo, but we like to use Mailchimp here at LaunchBoom. As long as you use one that can set up automations and can send normal email campaigns, you’ll be all good.
Step 5: Drive Traffic With Meta Ads
Now that you have your Reservation Funnel built, you need to tell people about it. By far, the best way to do that is with Facebook & Instagram ads… AKA Meta ads.
Creating a good ad really boils down to getting two things right:
- Target the right audience
- Make a good ad
Let’s start with audience targeting.
Targeting the Right Audience
An audience on Meta is really just a collection of interests. And like it or not, Meta knows a lot about what people are interested in.
To make this process easier and a lot more fun, I suggest using the Superfan Framework. Think about who would love your product. Stretch your imagination a bit here… give them a name, create a little backstory, give them an occupation, a family, and an income.
But the most important part here is to ask the following questions:
- What do they do for fun?
- What brands do they buy from?
- Who do they follow?
- What do they watch and listen to?
For example, here’s what the Superfan looked like for our campaign for the Polycade Sente, which raised over $1.6M on Kickstarter.
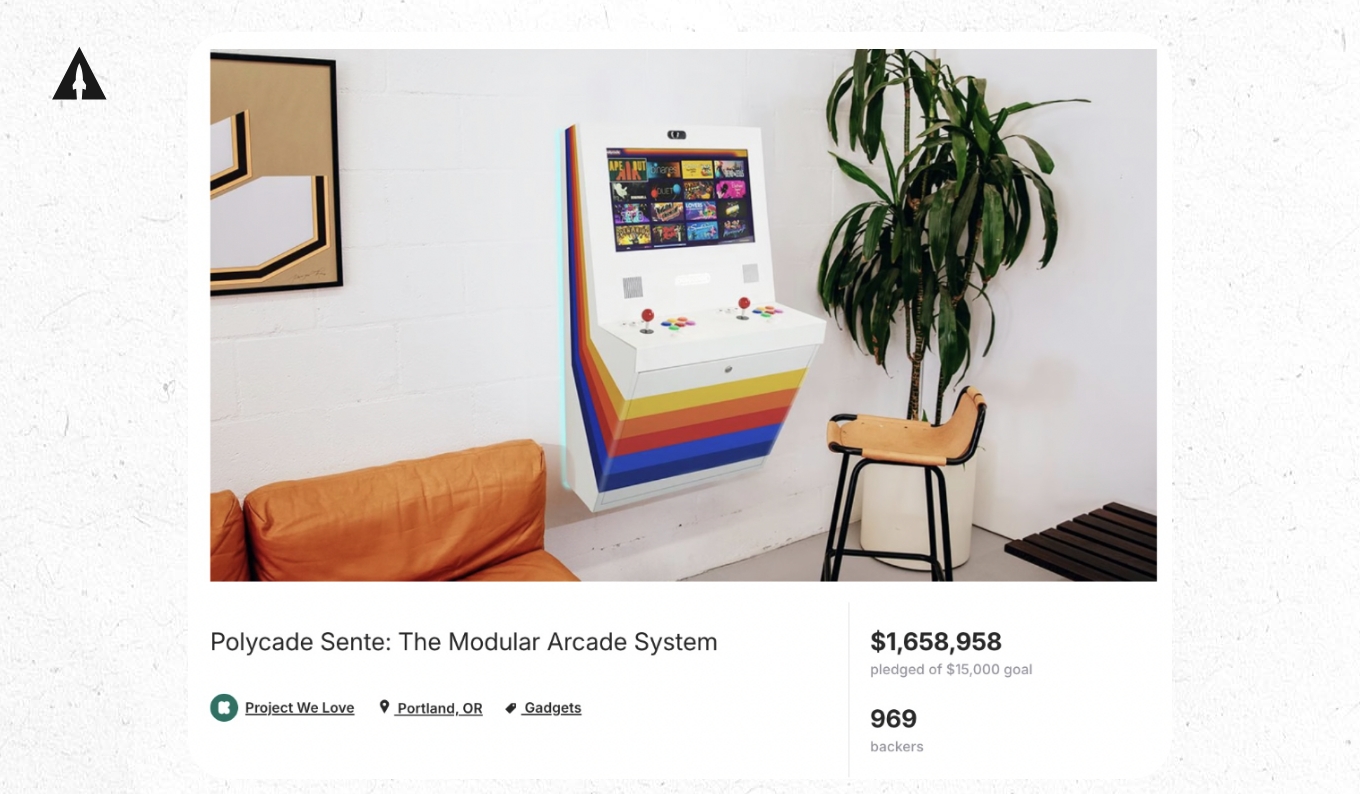
They liked video games, especially the retro arcade type. They liked the finer things in life like Ferrari, Supreme, and Montblanc watches. They were also a little bit of a nerd and liked reading Wired or watching the latest MKBHD video on Youtube.
These are all interests that can be grouped together and then targeted on Meta. For example, one of the audiences they created they called the “retro gamer” audience and targeted these interests:
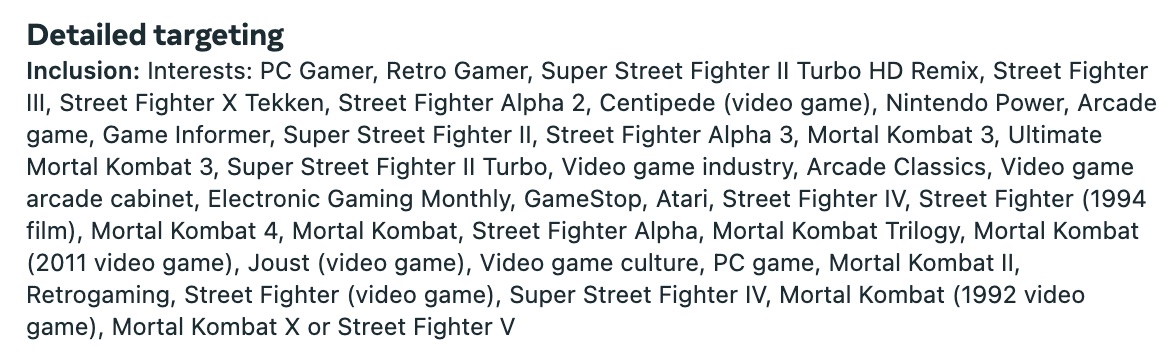
So first, think of who your superfan is, and then you can easily build your audiences.
Creating a Good Ad
Second thing you’ll need is to create a good ad, which is really made up of copy and imagery.
Let’s start with your ad imagery. This can be a photo or video and is the thing that will stop people from scrolling their feed to pay attention to your product. We’ve found that studio or location shots (like the ones you got during step 2) can perform really well here.
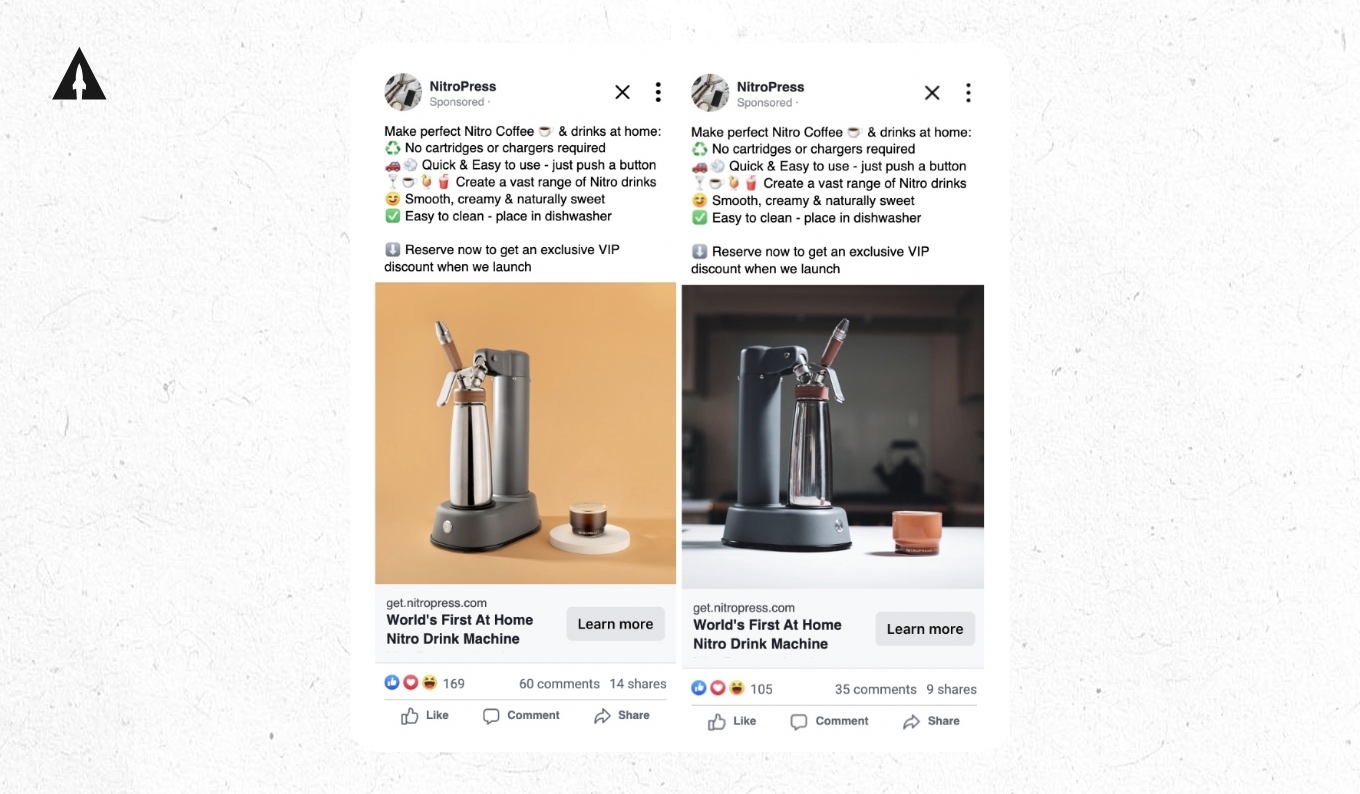
For example, check out these ads for our campaign for Nitro Press, which raised over £649K. The first is a nice studio shot and the second is a beautiful location shot, and both worked really well.
You’ll want to test different ads and audiences until you find the combinations that get you the lowest cost per $1 reservation. And when you find the best performing combinations, scale up your ad budgets until you have a big enough pre-launch email list to launch your campaign.

Step 6: Build Your Campaign Page
The campaign page is so important yet so many creators screw it up. This is not the place to “tell your story.” You’re trying to get people to buy. Which means treat it less like a “best selling novel” and more like a “direct response advertisement.”
Here are three tips to make a campaign page that sells.
Tip 1: Think in Headlines
You may spend hours perfecting every word on your page, but I hate to break it to you, most people aren’t going to read them. Instead, they’re going to skim. And what do they read when they skim? Your headlines.
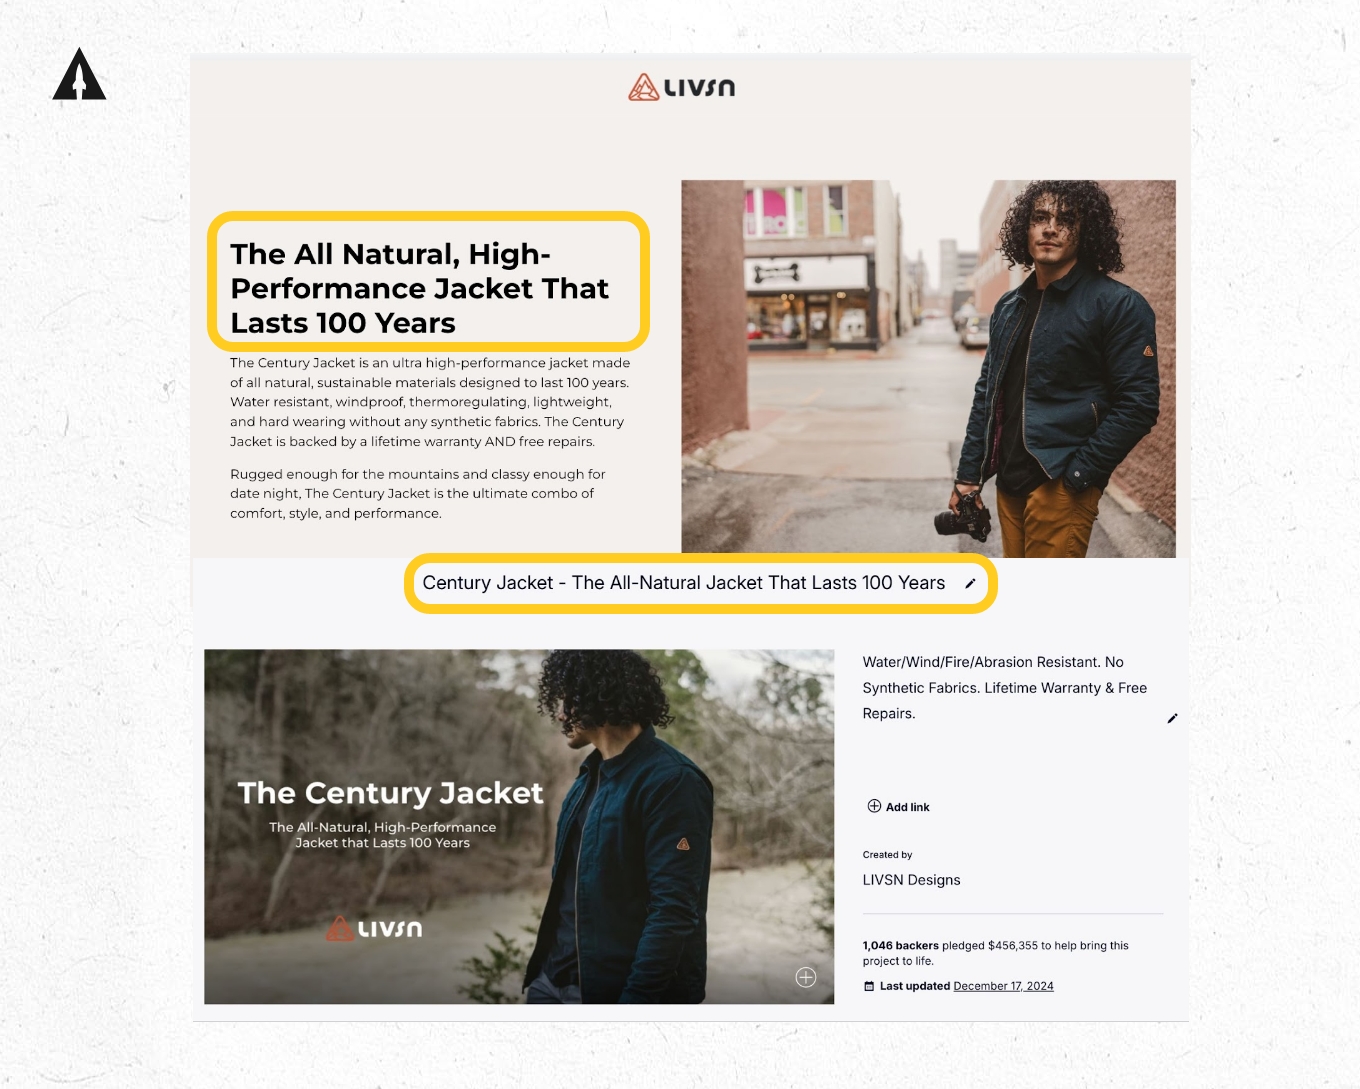
For example, check out what the page for our campaign for the Century Jacket looked like. As you skim down the page, the headlines tell you a lot of important information.
- Introducing the Century Jacket
- The all-natural, high performance, 100 year jacket
- Timeless silhouette for timeless wear
- Functional fit and functional form
- 100% natural, 100 years of adventure.
From just reading those headlines, you get a pretty good understanding of the main benefits and features of the product.
Tip 2: Use a Lot of GIFS
GIFs are great for showcasing those action shots you got during Step 2. For example, on The Century Jacket page, they used lots of GIFs.
If you go to the “Flattering Fit and Functional Form” section, they used two GIFs to showcase the different looks you can get from the jacket. Here’s one of them:

Tip 3: Use Your Pre-Launch Data to Influence Your Design
One of the coolest parts about all the advertising you’ll be doing during the pre-launch is that you’ll learn so much about what works and what doesn’t. Take those learnings and directly apply it to your campaign page.
For example, check out the best performing headline on the landing page for Century Jacket compared to their Kickstarter page:
They’re basically identical. That’s because the LIVSN team already knew the headline worked because they tested it during the pre-launch.
Do the same thing. Take your best headline and make it your Kickstarter headline. Take your best ad image and make it your campaign image. You get the idea.
Step 7: Create Your Campaign Video
Ahhh the campaign video, if I’m being honest I have a little bit of a love hate relationship with it. Yes, It is important and can be very persuasive in getting someone to buy your product, but it can also be a huge cash suck.
I’ve seen too many creators insist on spending way too much money on their campaign video. In nearly every case, I think the video shouldn’t cost you more than $15K. After that, there’s diminishing returns, and I’d rather just put that savings into something more productive, like ad spend.
And by the way, I think most first-time creators should spend a lot less than $15K. Let me show you a video we created that actually cost less than $10K to produce and was super effective.
Now like I said before, this video didn’t cost a lot to produce. Why? Well first off, it had a great script and was largely driven by a voice over. It was shot in one location with a few actors and those actors could easily be you or your friends. It made use of stock video to make the video more dynamic while keeping the cost super low.
This campaign went on to raise $332K on Indiegogo and Steve, the founder, even got on Shark Tank.
Now, assuming you don’t have video production experience, the hardest part about creating your video will be getting it shot and edited. That’s where a lot of the costs come in. You can keep the costs a lot lower by writing your own script and hiring contractors to help you get it filmed and edited. There are also really good agencies that specialize in campaign videos, but I would recommend going for their lower-cost packages in most cases.
Step 8: Choose Rewards & Pricing
You can think of rewards as the “buy options” for your Kickstarter campaign. These are the things that people “back” and they are super important to get right.
I’m going to give you three different reward strategies that we’ve used on thousands of campaigns, but first, you need to understand the 6 key pricing concepts that we use. Because these concepts are why these pricing strategies work so well.
6 Key Pricing Concepts
First up, discounting. You know, the classic “get it at 50% off” strategy. This is one of the most popular pricing strategies within crowdfunding.
Second, price anchoring. If you saw a product for $100 today, and then tomorrow it was $50, you’d think you were getting a great deal, right? That’s price anchoring and it can be a very powerful tactic within crowdfunding.
Third, scarcity. This is where you limit the amount of something being available. This can be very persuasive because people don’t like to miss out on stuff.
Fourth, urgency. This works just the same as scarcity except it uses limited time instead of limited quantity.
Fifth, the paradox of choice. This is a concept from Barry Schwartz which points out that when humans have too many choices, they often make no choice at all. For that reason, we want to keep our rewards as simple as possible.
Sixth, value stacking. As the price increases, the value associated with that reward actually goes up. Another popular name for this is bundling.
Alright, now that you understand the 6 key pricing concepts, let’s get into my top 2 reward strategies.
Reward Strategy #1: Discount Stacking
This is best for creators who (1) are only launching one main product and (2) are NOT in the Games category.
For example, let me show you how this worked for our campaign for the Desk Nest, which raised $468,628 on Kickstarter. Here’s how the rewards were broken down:
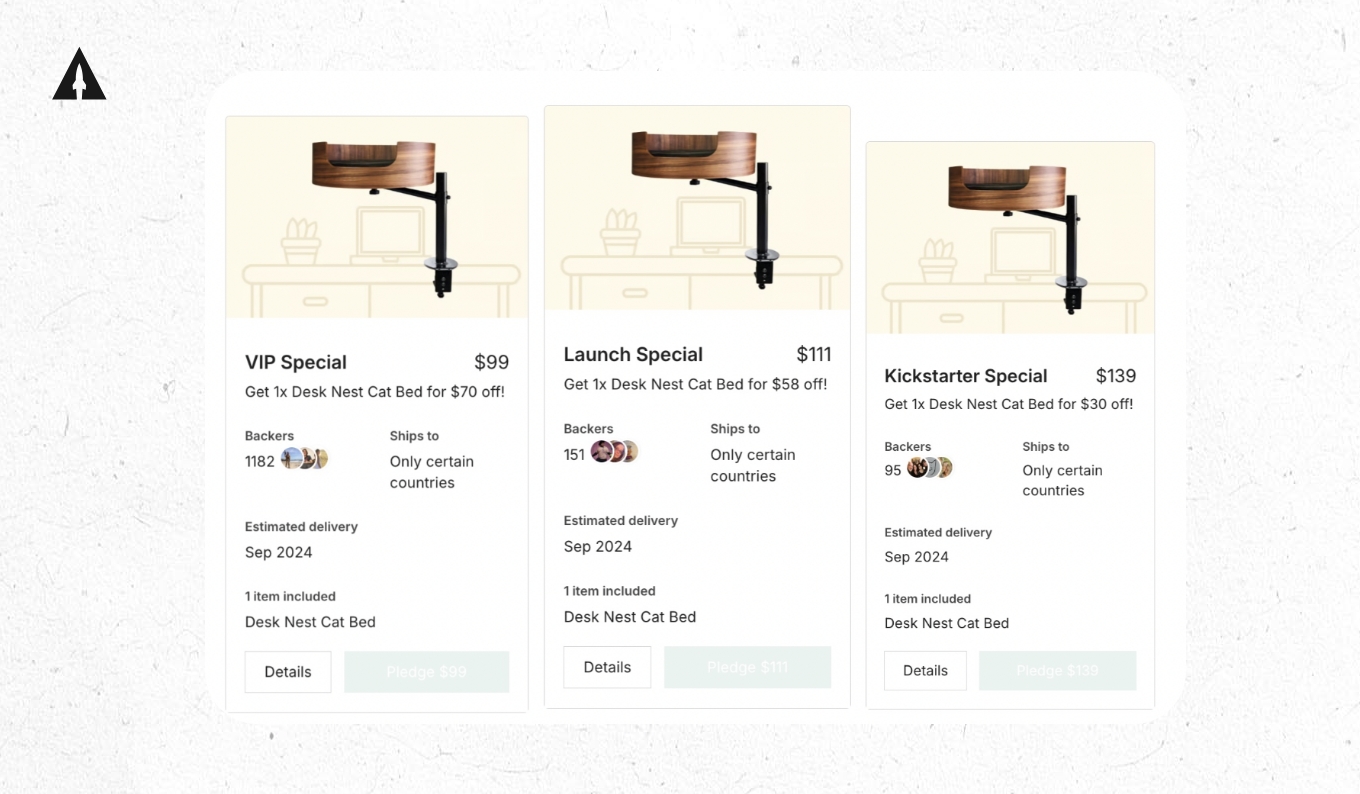
These are all different reward options on Kickstarter but each is selling the exact same product. The only difference is the discount being offered. Each of these rewards use different limits of time and quantity to incentivize backers to get in earlier.
Reward Strategy #2: Value Stacking
This works great if you have multiple stand-alone products or if you’re in the Games category.
With value stacking, when the price goes up, so does the value being offered. That’s because you’ll bundle different valuable items together in each reward tier.
For example, let’s see how our client ARIDNYK did this on their Kickstarter campaign. Because they had lots of different products to sell (including their main game and lots of add-ons), it made sense to use value stacking as their reward strategy.

Again, each reward tier offered more value, which only incentivized backers to spend more money. This worked super well for ARIDNYK as they went on to raise $132,435.
Step 9: Set Your Funding Goal
At first glance, setting your funding goal on Kickstarter should be easy, right? I mean, shouldn’t it just be the amount you need to make your product?
Well, for many creators, the answer to that question is increasingly becoming “no.” You see, crowdfunding is not just used as a “funding” tool, but a marketing tool. It can be used for both at the same time by the way, but many creators are using it more for marketing than for funding.
And depending on how you define success for your campaign, will tell you what you should set your funding goal at. To help you figure this out, it’s important to answer some questions first:
- What are the fixed costs to create your product?
- If you lost money on the crowdfunding campaign, would you still bring it to life?
- If so, how much are you willing to lose?
With the answers to those questions, ask yourself which of the two strategies you identify with more:
- Funding strategy: you need to raise a certain amount of funds to create your product. If you don’t, it’s very unlikely you can get funds from somewhere else.
- Marketing strategy: you already have the funds to create your product. Kickstarter is your way to get mass exposure and you’re okay with losing some money on the campaign.
If you answered Funding Strategy, then the answer to setting your funding goal is simple. Set the funding goal at whatever the amount is you need to create your product. To figure this out, you’ll have to be further along in the product development process. That means, at a minimum, having a quote from your manufacturer to how much it will cost to produce your minimum order quantity.
Now if you answered Marketing Strategy, then the funding amount should be whatever you believe you can hit on day one of the campaign. Because getting funded quickly has huge benefits such as increased social proof, attracting press, and getting free traffic from Kickstarter.
To figure out how much you can raise on the first day, it’s pretty easy. You can take the number of emails on your list and calculate what percentage of the list you believe will convert into a backer. Multiply that number by your price point and you can get a good estimation of how much you’ll raise on the first day.
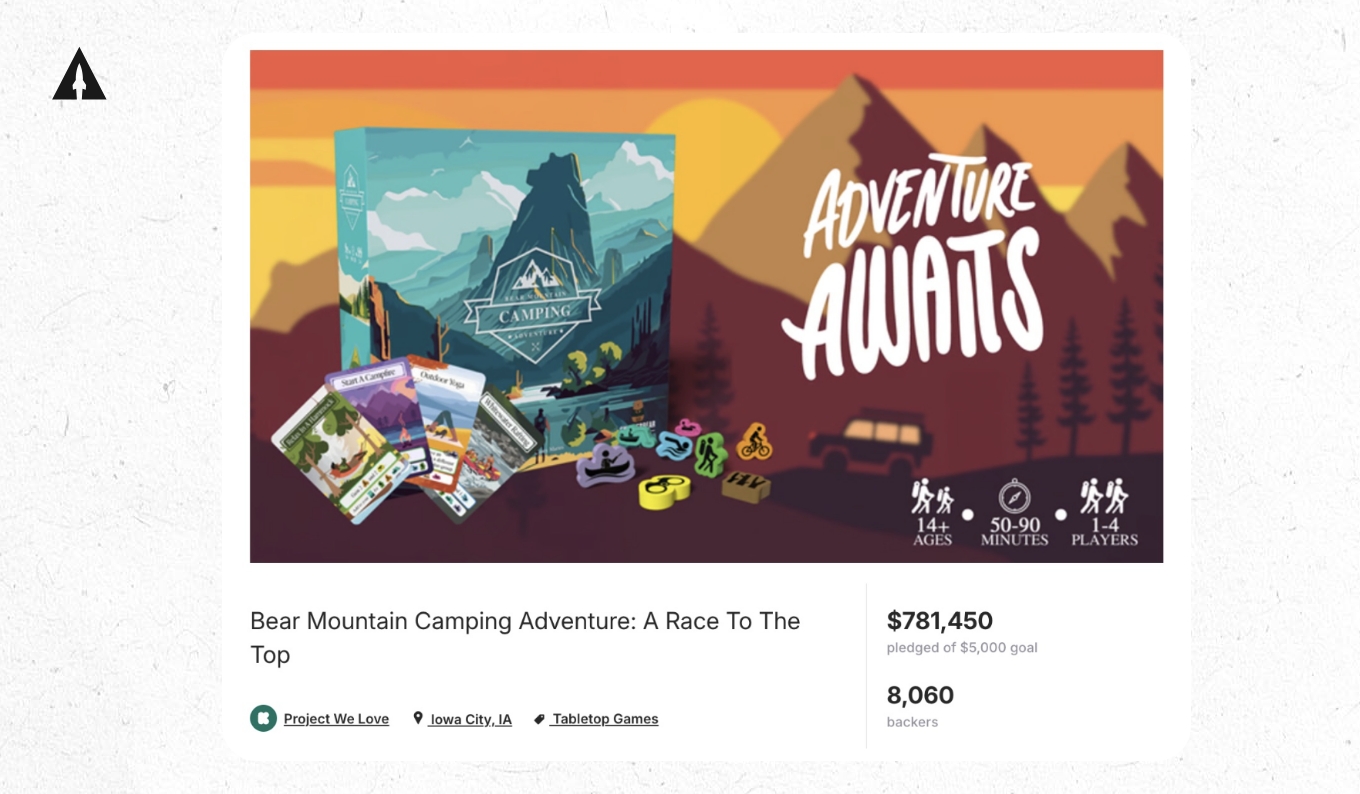
For example, one of our campaigns Bear Mountain Camping Adventure had 1,826 people who put down a $1 reservation in the pre-launch. We conservatively estimated that 30% would turn into a backer. With the lowest price point of $39, we’d generate $21,364 on the first day. So the goal was set at $5,000 because we thought we could blast through it.
That’s exactly what happened. The VIP list ended up converting at 51% and contributed over $89K in sales to the campaign, which went on to raise $781,450.
Step 10: Choose Your Launch Date
I’m going to tell you the exact month, day, and hour you should launch your project. How? Well, we have data from over 342K Kickstarter campaigns that was analyzed by Kick Notify. The data clearly shows when the best time to launch a Kickstarter campaign is.
Best Day of the Week
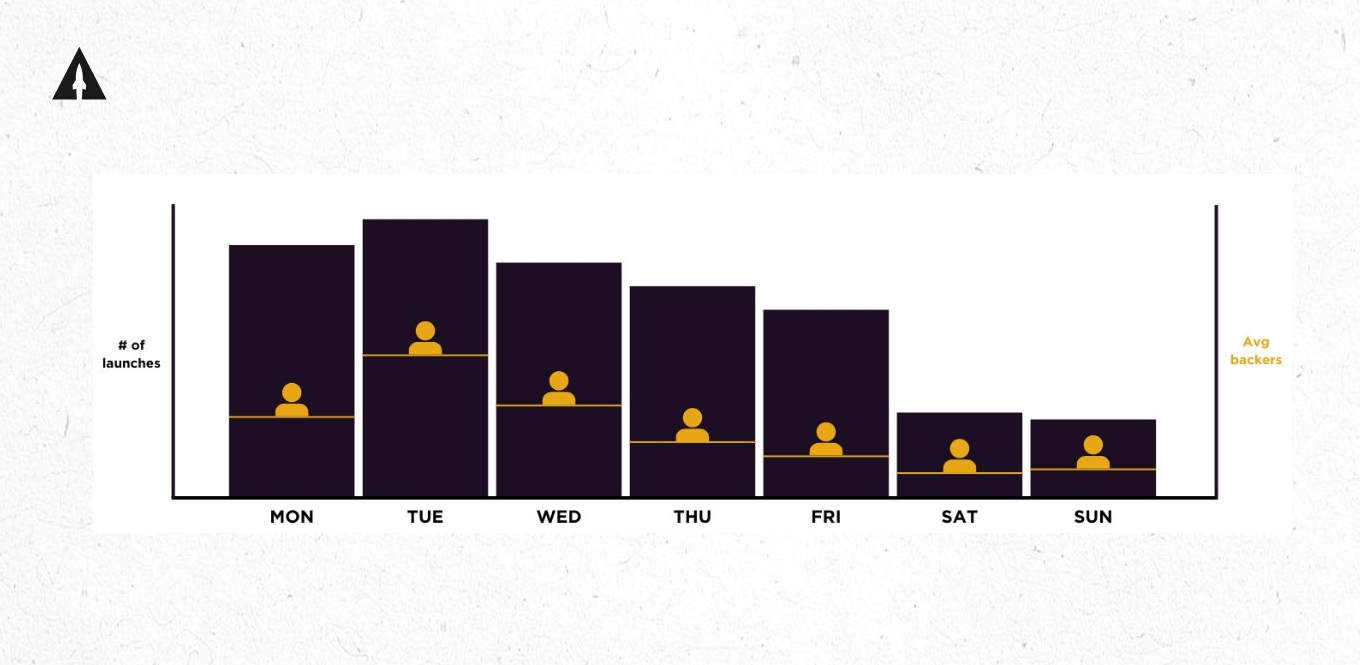
As you can see, Tuesdays have both the most launches and average number of backers per project. This means it’s the best day of the week to launch.
Why is this? Well, email open rates tend to be the highest on Tuesdays. And email is typically how creators are announcing their launches. So a higher open rate is going to send more backers to a campaign.
Best Time of the Day
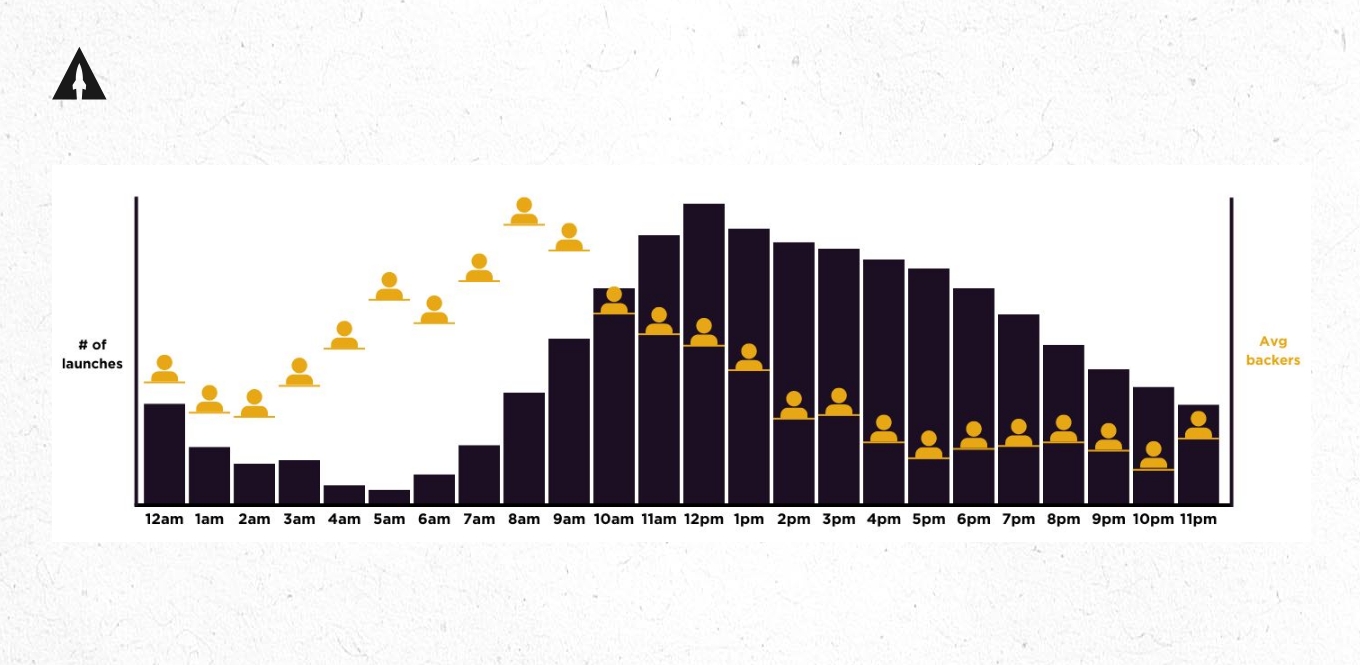
All of the times are in Eastern Standard Time. Clearly the morning is the best time to launch. If you launch somewhere between 7 to 10 AM, you’ll be good.
This makes sense since the majority of Kickstarter’s market is in the US. So trying to take advantage of the entire day in the US is the best strategy. That is unless your audience is primarily based in a completely different timezone. For example, if over 50% of your email list lives in Europe, then launch between 7 and 10 AM in that time zone.
Best Month
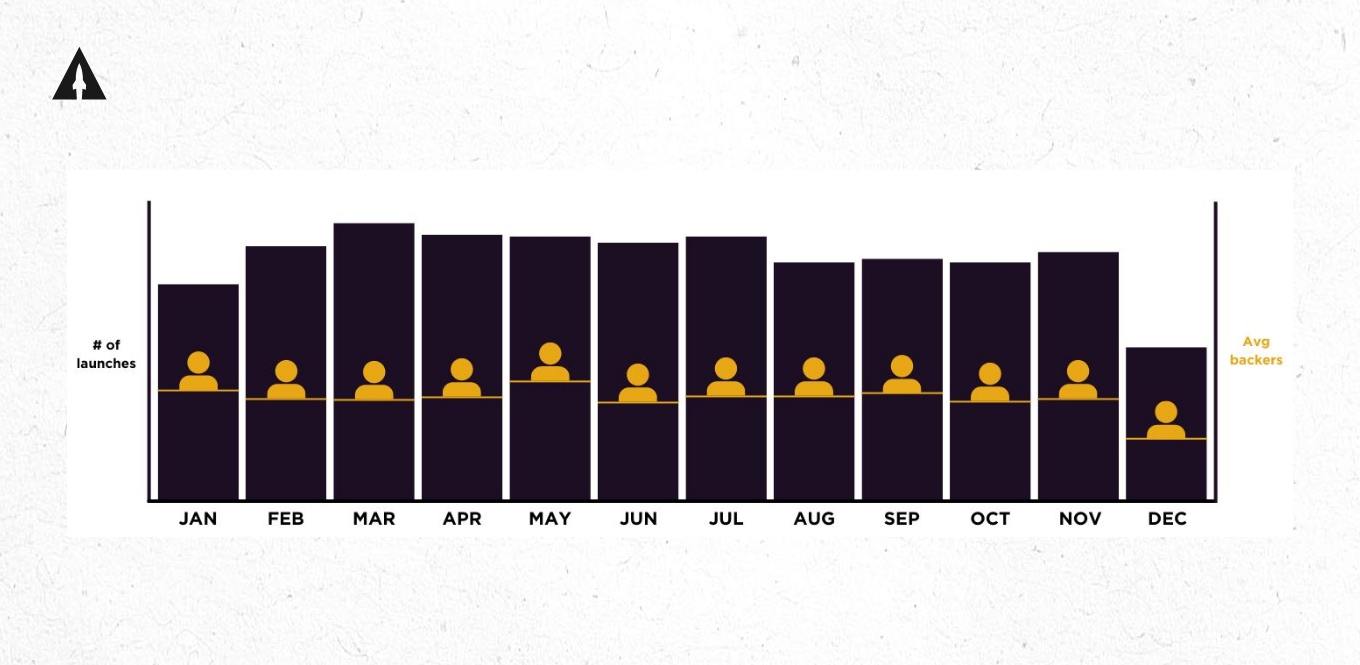
What pops out to you immediately when looking at this chart? Probably that there isn’t too much difference between all the months… except for one month. I’m looking at you December.
Yep, December is the worst month to launch. That’s because December is the month of holidays and gifting in many parts of the world. Both of those things don’t play very well with crowdfunding.
When people are taking a holiday, they don’t buy a lot of stuff for themselves. Especially when that holiday revolves around buying gifts for others. People don’t buy gifts with crowdfunding because it’s a pre-order, and they won’t receive the product for a long time.
By the way, I would also advise against launching in November if you can avoid it. The end of the month is where we see huge sales for Black Friday and Cyber Monday. So Brands will start spending a lot on advertising, which creates more competition and increases the cost of advertising for you.
So the takeaway here is that May is the most popular month by a slight margin, but really any month is okay as long as it’s not December or November.
Seasonality Matters
But there is one more thing to take into account here: Seasonality. You want to launch in the season when people will use your product, not when they will receive your product.
For example, let’s look at our campaign for the GoSun Chillest which is a cooler to be used outdoors.
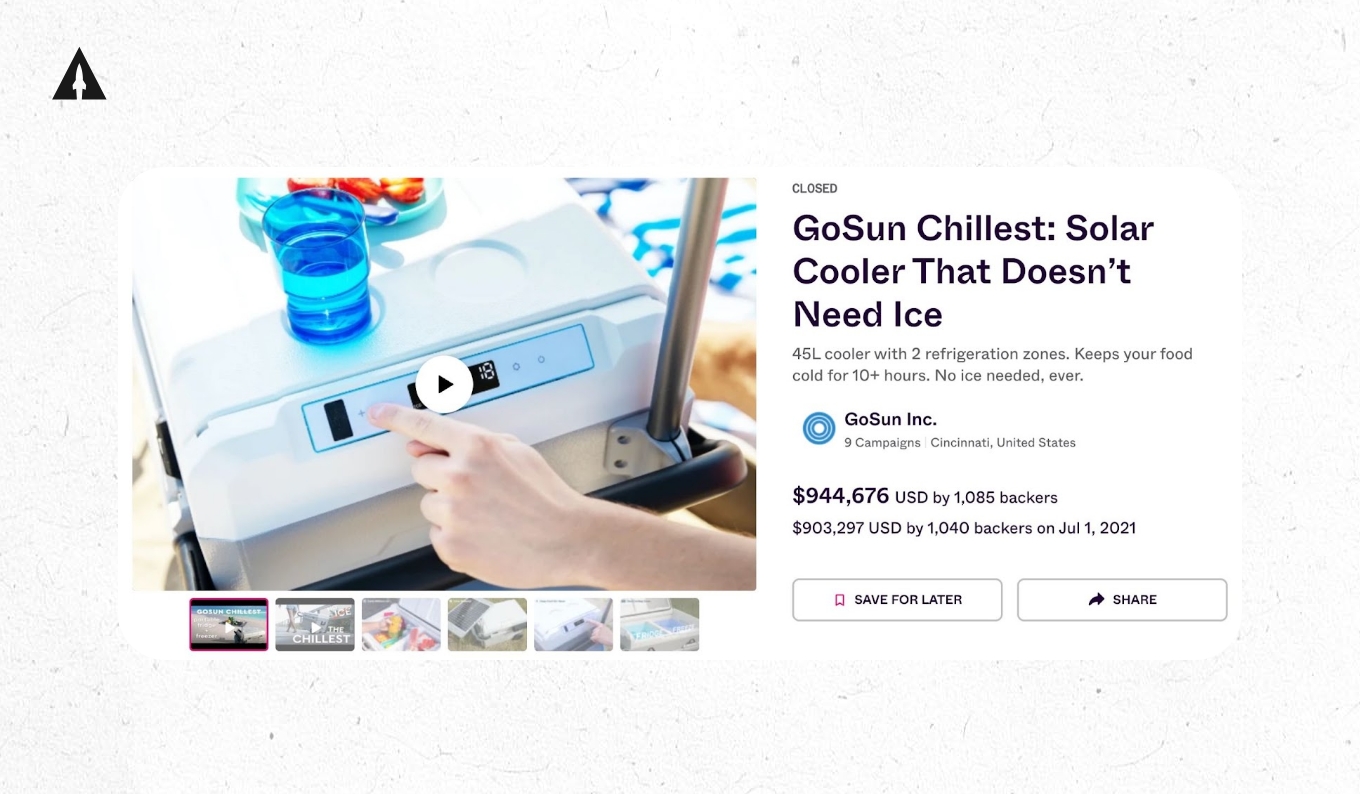
When do most people use coolers the most? Well, during the summer, so that’s when they launched. And you want to know when people received the product? In January, when it’s cold and people aren’t using coolers.
This may seem counterintuitive, but backers buy stuff based on the desire to have something now, even if they won’t receive that thing for a long time. So if you have a seasonal product, launch during that season.
Step 11: Launch (and get funded)
On the first day of their campaigns, Polycade raised over $1M, Botany raised over $100K, and NanoFoamer raised over $387K… blowing past their funding goals in a matter of minutes. How in the world did they do that?
Well, to answer that question, we have to go back 1 week before launch day. This is where you’ll start the hype train with your pre-launch email list. There are two emails you’ll send to your email list:
- 7 days before you launch
- 1 day before you launch
That’s it. Sending too many emails is the quickest way to get people to stop opening your emails. And if that happens, then all the money you spent collecting those emails will be wasted.
After you send these emails, the next milestone will be your launch. Send one email in the morning and one email in the evening. Yes, two emails in one day. Once you launch it’s okay to email your list a lot more because you have something to sell.
If you do this right, you’ll blow past your funding goal on the very first day (and in most cases it will happen in minutes). That flood of backers will shoot you up in the rankings on Kickstarter which will bring more visibility to your campaign. And I’m talking about a lot of visibility. Usually between 20-30% of the total funding amount will be from Kickstarter itself.
For example, for BOTANY, it was actually 31% which meant that over $334K was sent by Kickstarter. Which is a crazy amount of money.
Now once you get funded quickly, make sure you take a minute to celebrate, but not for too long. You still have a lot of time left in your campaign. And a lot more opportunity to raise even more money.
Step 12: Drive More Traffic with Meta Ads
Yep, we’re talking about Meta ads again. Because in nearly every big campaign you see, the driving force of continued funding is from Meta ads. So let’s talk about how they work and how you can use them.
Unlike pre-launch where you have to predict your return on ad spend, once you are live, you can see exactly how much money you are making for every dollar you are spending on advertising. That means you can now make decisions on increasing or decreasing your ad spend much more easily.
One of the easiest advertising wins you can get will be to set up remarketing. Remarketing is where you target people you have already marketed to in the past. For example, I recommend remarketing to your entire pre-launch email list.
Some of you may be saying, “why should I advertise to people who already signed up on my email list?” This is part of what I call the “surround sound” strategy. When you launch, you want to be everywhere! Doing this will ensure that people who sign up on your list won’t miss your launch.
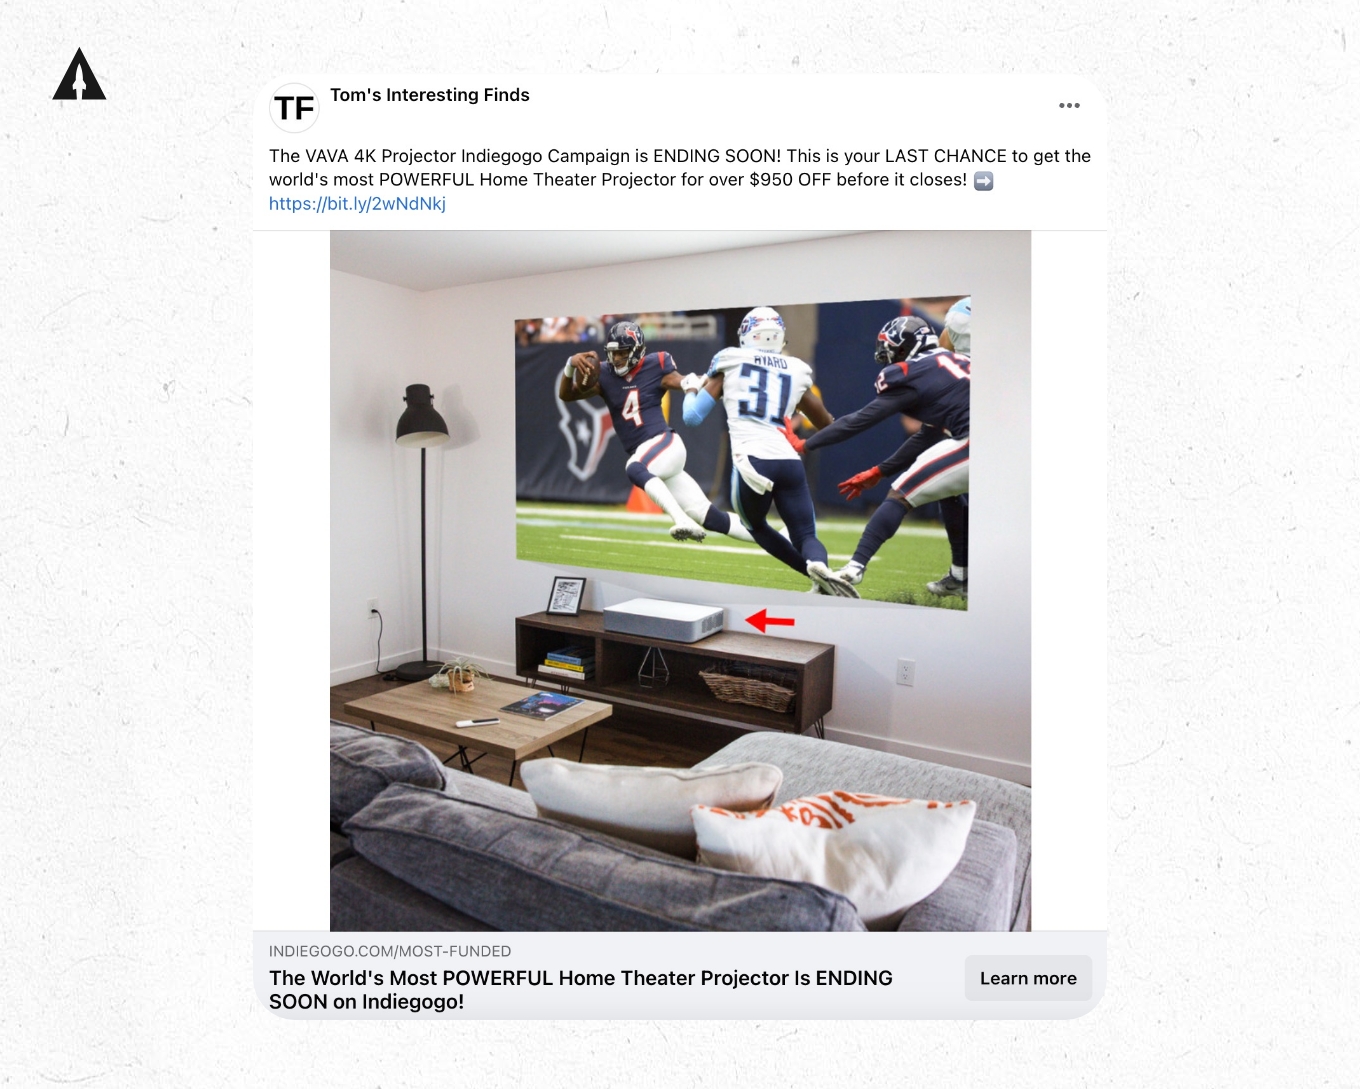
For example, take a look at the remarketing efforts for VAVA who ended up generating a 30 times return on ad spend from remarketing to their list.
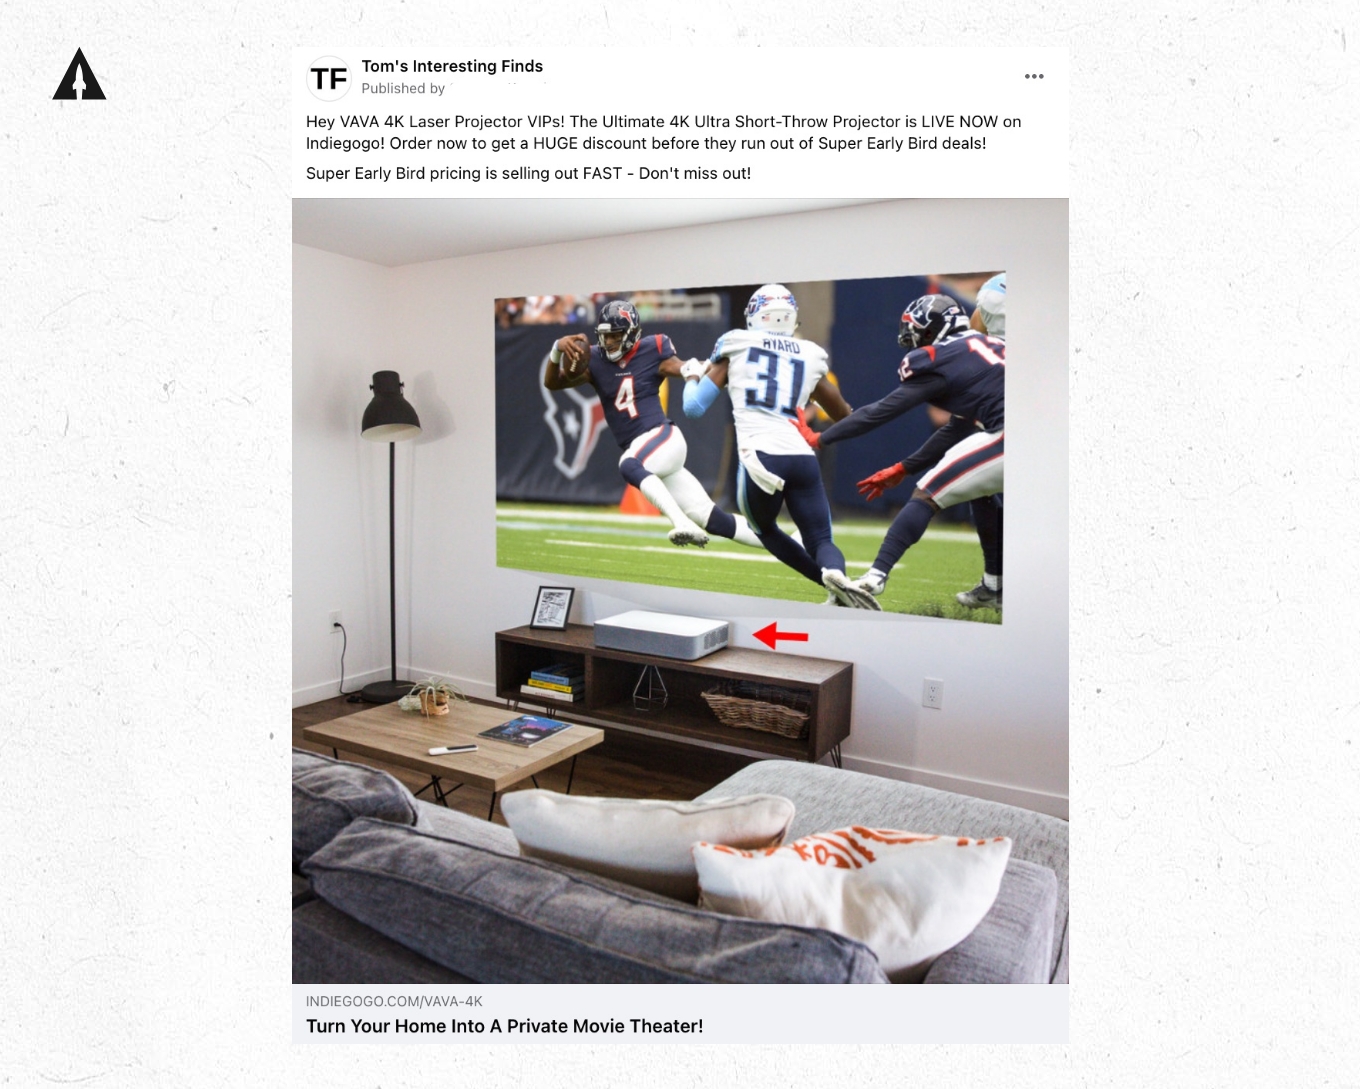
As you can see the copy directly speaks to the VIPs, “Hey VAVA 4K Laser Projector VIPs!” You’ll want to do something similar. Now, this ad was super effective. We spent $3,569 on this ad and it generated over $107K in direct revenue.
After remarketing, you can try to attract completely new people to your campaign. Let’s start by talking about two audiences you should target:
First, a lookalike audience of your VIP list. And second, your best performing pre-launch audiences.
To create a lookalike audience of your VIP list, just upload it to Meta and it will create it for you. A lookalike audience is when Meta takes a seed audience, in this case your VIP list, and then creates a completely new audience with similar interests and demographic information. This is a way to fast track the audience creation process and let Meta do a lot of the work for you.
Next, let’s talk about the ad copy. There are a few copy tactics you can use:
First, social proof, like how overfunded your campaign is. Second, reviews, like testimonials or press mentions. Third, hyperbole, where you lean into a favorite feature and use a very strong adjective like insane, ultimate or genius.
For example, check out this ad from our campaign for Lomi which raised over $7.2M.
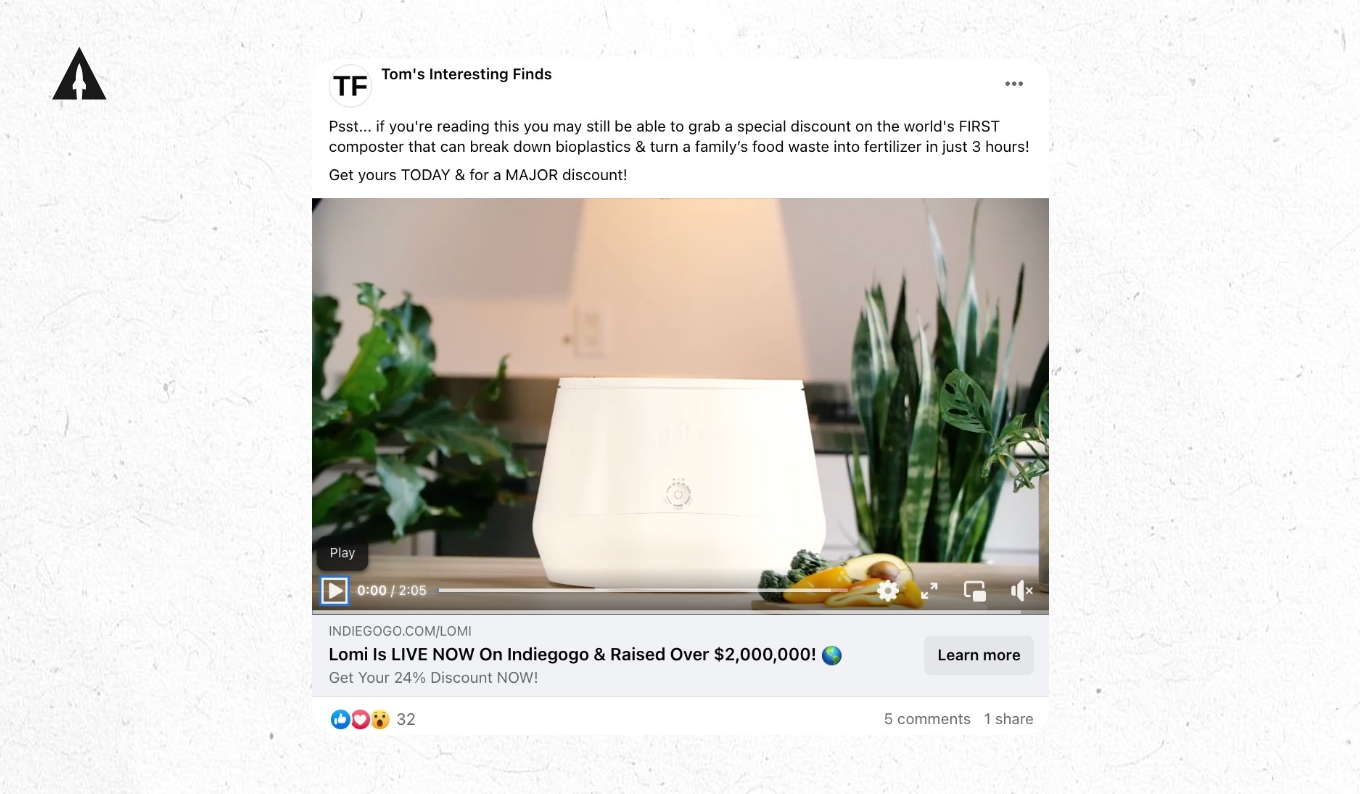
We leaned into social proof by saying it had already raised $2 million. This ad got a 4.77 times return on ad spend.
Step 13: Use PR & Influencer Marketing
Have you ever been at a restaurant and heard someone ask the server “hey, what do you recommend?” How often did that person go with what the server recommended? Nearly every time, right?
That’s because humans are heavily influenced by the recommendations of others, even if that person is a complete stranger. And the data backs this up, 90% of people claim to trust a brand more when it’s recommended by others… Again, even those people are strangers.
This is why PR & Influencer marketing works so well. Trusted 3rd parties will make a recommendation about your product and other people will buy your product because of it.
How to Find Influencers
Influencers come in all sizes, so let’s talk about the different types out there.
There are five main types of influencers ranging from Nano to Mega all separated by how many followers they have.
- Nano: 1000 – 10,000 followers
- Micro: 10,000 – 50,000 followers
- Mid-tier: 50,000 – 500,000 followers
- Macro: 500,000 – 1,000,000 followers
- Mega: 1,000,000+ followers
Now, while Mega, Macro, and Mid-Tier influencers might seem more enticing because of their follower count, I recommend setting your sights on Micro and Nano influencers.
Why? Because Micro and Nano influencers are…
- Easier to reach
- Typically have much higher engagement
- Specialize in specific topics or industries
- Are more open to commission agreements
So, for all these reasons, Micro and Nano influencers often deliver a much higher return on investment than their counterparts with more followers.
But wait, how do you go about finding these influencers?
Well for example, let’s say you’re launching a travel backpack, like The Nomatic Travel Bag campaign.
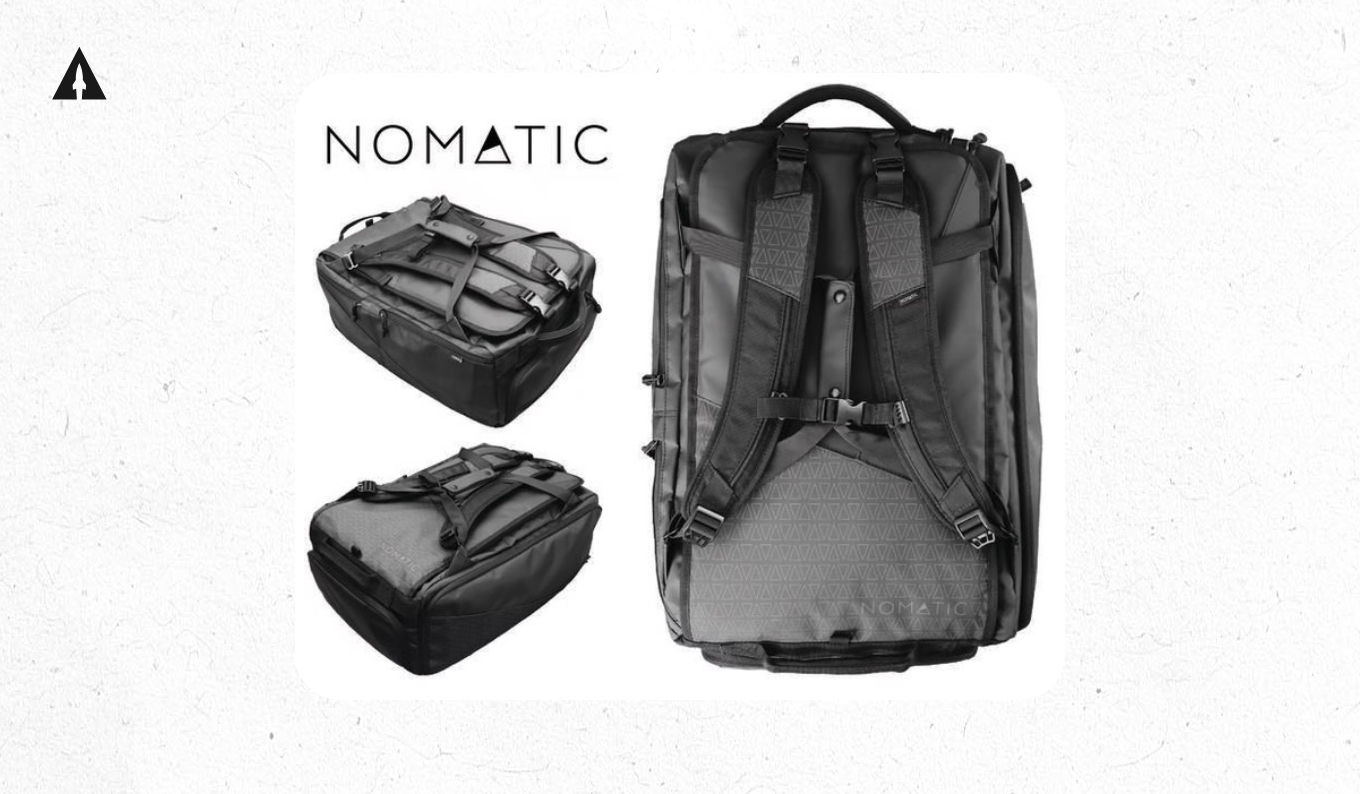
Here’s how I’d go about finding influencers. Start with YouTube. Search for travel backpack reviews, and you’ll find a list of YouTube channels that you can reach out to.
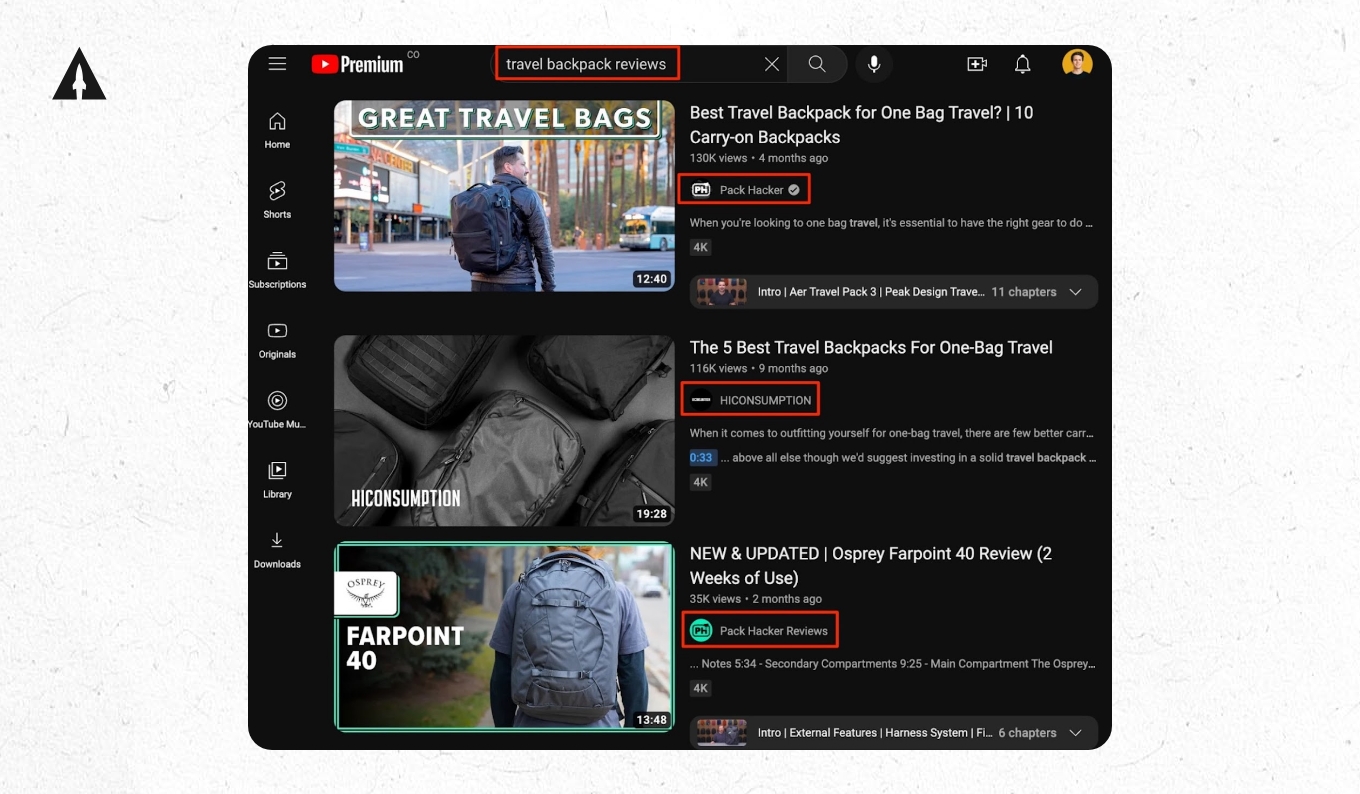
You can do the same thing on TikTok or Instagram.
Once you’ve found your influencers, it’s time to reach out. But how do you make your outreach stand out from the crowd? When reaching out, keep it personal instead of formal. Compliment the influencer’s work, and explain why your product aligns with their audience.
But here’s a reality check, influencers rarely work for free. So, be prepared to invest something. Based on Shopify’s recent data, the going rate is about $100 per 10,000 followers.
But here’s a little secret. Nano and Micro influencers are more open to commission agreements. So consider setting up a Kickbooster account, which will allow you to easily set up an affiliate program for your Kickstarter campaign.
Not every influencer will say yes, but when they do, it’s like having a trusted partner that you only have to pay when they get you a sale.
How to Get Press
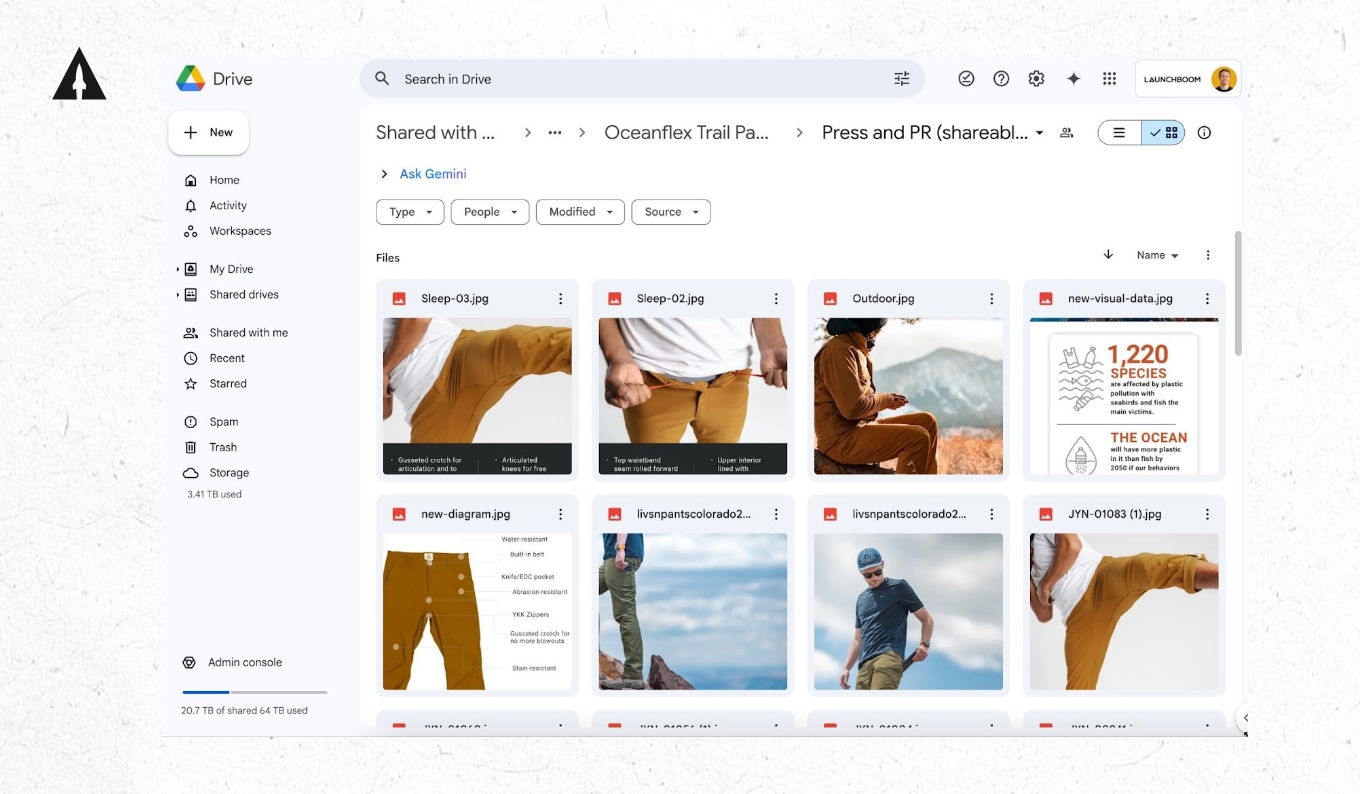
The first thing you’ll want to do is create a press kit. This is simply a collection of assets that journalists and media outlets want. It’s honestly really easy to make. Create a folder on something like Google Drive or Dropbox and fill it with photos and videos of your product. Then, place it at the bottom of your campaign page and link to it.
For example, here’s what it looked like on the campaign page for EcoTrek, a client of ours who raised over $514K. If we click on the press kit you can see a collection of images that press could use in their articles.
With the press kit made, it’s now time to reach out to some journalists. But how do you know who to reach out to?
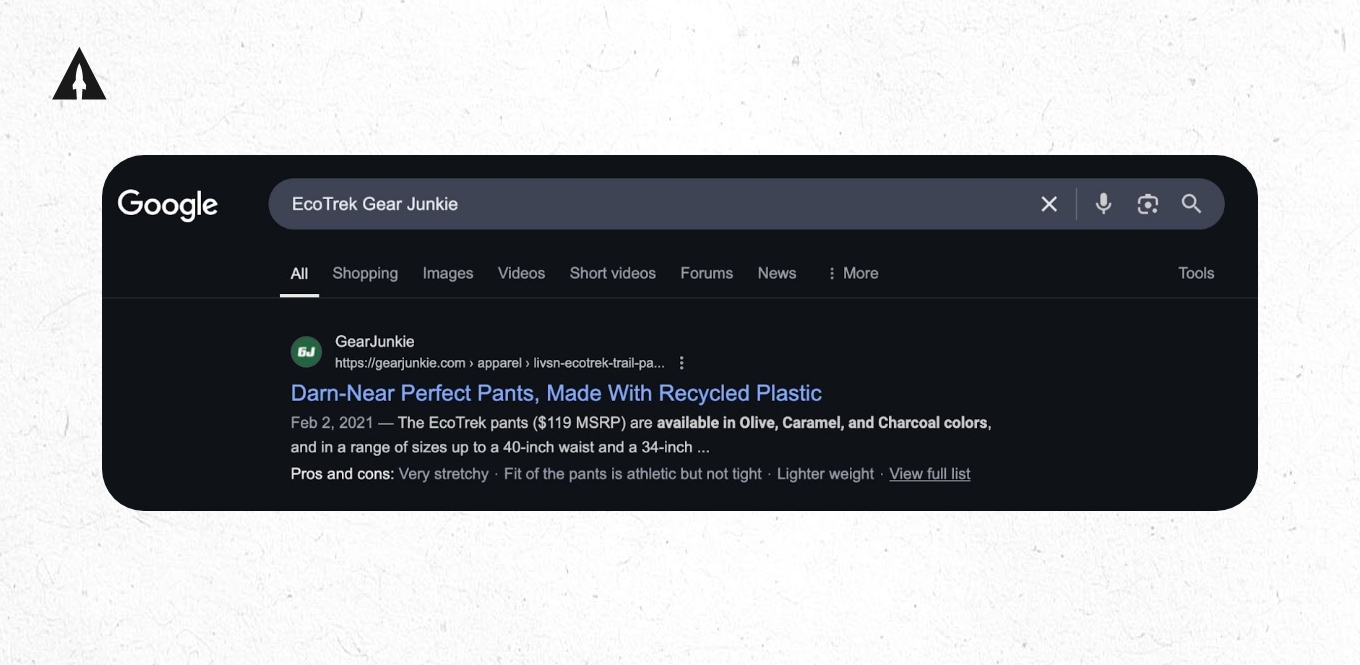
The easiest way to figure out who to reach out to is to go to campaigns who have the same audience as you and see who covered them. For example, let’s say you have an outdoor product that would appeal to EcoTrek’s audience who I just showed you. You could go to their Kickstarter campaign and see who they were featured by.
EcoTrek got covered by Men’s Journal, Outside magazine, Forbes, Gear Junkie and a few others. Next, let’s go to Google and find these articles. For example, I can type in “EcoTrek Gear Junkie” and see that an article pops up.
At the top of the article, we’ll find the journalist’s name.
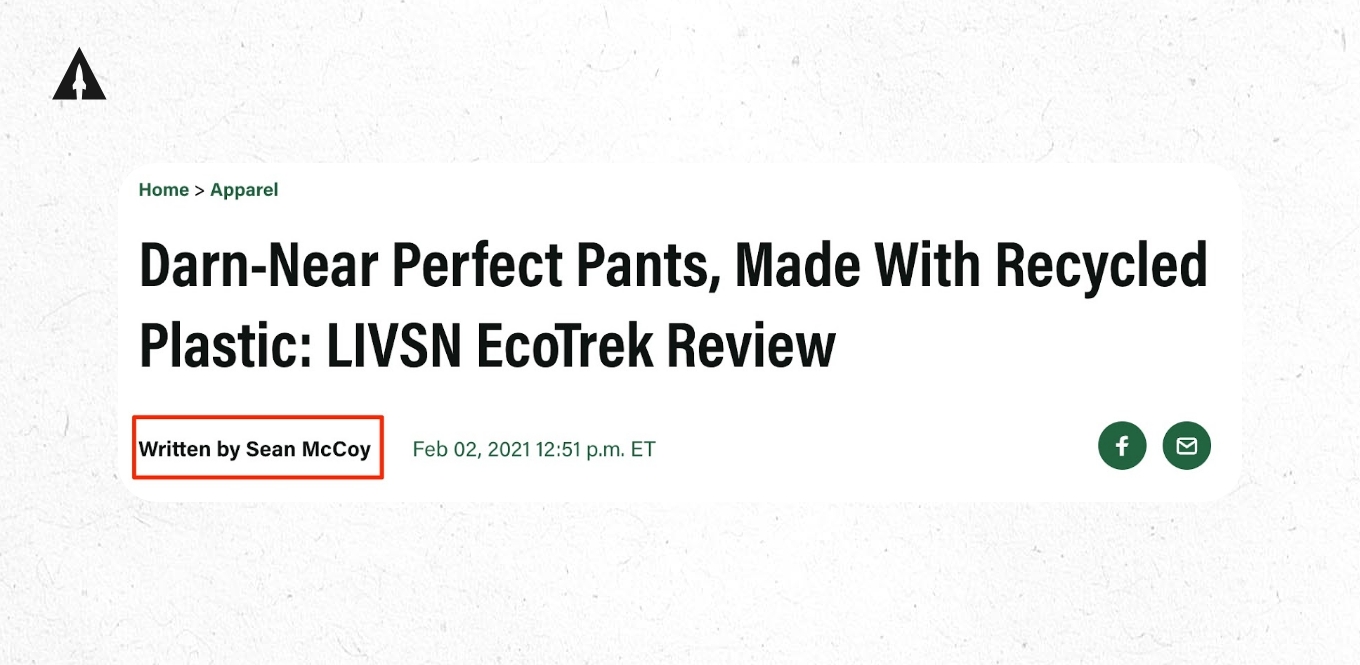
From there I can choose one of his social profiles to reach out.
From here, you can send the journalist a message. Remember, outreach is a numbers game. Not everyone will respond, but the more you reach out, the higher the chance of getting coverage.
Step 14: Boost Your Campaign
Alright, I’m going to tell you something not a lot of people like to talk about. There’s a period in many crowdfunding campaigns we lovingly call “the valley of death.” Maybe a little dramatic, but there’s a reason why it got this name.
It’s normal for campaigns to get a lot of funding at the beginning and at the end of their campaign. The middle part is the valley, where it can be easy to lose momentum.
So here are 3 tactics to help you avoid this valley of death.
Tactic #1: Cross Promotions
This is where you reach out to other live Kickstarter campaigns to see if they want to promote you and vice versa. How this works is you’ll include each other in one of your campaign updates.
For example, here’s what some of the cross promotions looked like for our client’s campaign for Alpha Shovel.
As you can see, they included The Pocket Samurai at the end of a campaign update and The Pocket Samurai did the same for Alpha Shovel. All in all, cross promotion partners like Pocket Samurai drove nearly $10K in sales for the alpha shovel campaign.
Tactic #2: Backer Newsletters
These are companies that have their own backer communities that you can promote to. There are actually quite a lot of these newsletters and some are better than others.
For example, ones that I’ve seen work really right now are First Backer from Jellop, Pledge Box’s newsletter and BackerMany. Make sure you do a little research before you go with one and try to only work with newsletters that work on commission or have very low fees (like a few hundred dollars).
Tactic #3: Platform Promotions
This one really depends on which platform you launch on. On Kickstarter, there is no way to pay for promotions. Indiegogo on the other hand, will gladly talk to you about different promotions they have and how much they cost.
But let’s go back to Kickstarter. One of the best ways to get promoted is to first get the coveted “project I love” badge. Not only does it look great, but it also gets you more visibility on Kickstarter.
I know what you’re thinking… How do I get that badge?? Well here’s exactly what Kickstarter’s team has told me to focus on: First, create something that is truly innovative and unique. And second, design a very aesthetically pleasing campaign page. Lastly, it’s more likely you can get the badge if you get introduced to someone on their team.
Step 15: Finish Your Campaign Strong
We’re approaching the finish line. But you don’t want to celebrate just yet… Instead, you’re going to sprint through it.
There are two areas you’ll want to focus on here. The first is email marketing and the second is Meta advertising.
Starting with your email list. There are three emails you’ll want to send. One will be sent three days before you end. And the final two emails will be sent on your last day.
That’s right, you should send two emails on the final day: one in the morning and one in the evening. If you have Kickstarter exclusives, you’ll want to talk about those in your emails.
The second tactic is Meta ads… again. I’m only bringing it up one more time because you’ll want to change your strategy a little bit here.
First off, who should you target with your ads? Besides continuing to target audiences that are still working from before, I’d start remarketing again. Again, remarketing is when you target people that you’ve already marketed to in the past.
Here are the different remarketing audiences I would target: One, Your entire email list. And two, Everyone who went to your Kickstarter page and didn’t buy.
For your ad copy and ad creative, you’ll want to update the messaging a little bit. The main change will be to lean into urgency since the campaign will be ending soon. For example, let’s pull up this ad from our campaign for VAVA which raised over $2.1M.
As you can see, we leaned heavily into the limited time remaining in the campaign by using phrases like ending soon and last chance.
Do the same thing for your campaign and you’ll finish your campaign strong… Bringing in a spike of funding and sending your campaign to new heights. But just because your campaign has now officially ended, doesn’t mean you can’t keep raising funds.
Step 16: Set Up Late Pledges
So you made it past the finish line… Now what? Well, for one, it’s time to make your product. But while you’re making your product, why not continue to make sales?
Well, that’s where Kickstarter Late Pledges come into play. By turning on Late Pledges, you can continue to make sales on your Kickstarter campaign. For example, when our client Loka Chai Maker turned on Late Pledges, their campaign had ended at $595,442. Using Late Pledge they raised an additional $68,772.
Here are 3 tips to keep in mind when setting it up:
One, announce late pledges in a campaign update. Let everyone know that they can still back the campaign if they missed out!
Second, make your late pledge rewards a slightly worse deal than your live campaign. One of the main incentives for people to back your live campaign is typically to take advantage of some type of deal. This could be a discount or a limited exclusive item. It’s a best practice to not offer the same deals to late pledges. That way, you can make sure that the people who supported you early are rewarded the most.
Third, if you’re using late pledges, don’t set up another store. I’ve seen some creators want to set up Kickstarter late pledges, a pledge manager pre-order shop and their own ecommerce store thinking they will cast a wider net and get more sales. But actually, the opposite happens.
Treat Kickstarter late pledges as your one pre-order store while you are creating your product. Drive all traffic to this page. This will make potential backers less confused and make it way easier for you to manage fulfillment.
Lastly, it’s important to note that with Kickstarter Late Pledges, the backer’s credit card is charged immediately. This is unlike your live campaign where backers’ credit cards are charged when your campaign ends. This is a good thing. It means you’ll get a steady stream of cash flow while you manufacture and fulfill your product.
Step 17: Use a Pledge Manager
By this point you’ll have hundreds, thousands, or maybe even tens of thousands of customers who can’t wait to receive your product. And there’s one thing that will make delivering your product to these customers way easier. That thing is called a pledge manager.
You see, when someone backs your campaign, they don’t actually give you much information besides their name and email and whatever reward they chose. You’re missing some really important stuff like their shipping address or what variants (like size or color) of your product they want.
That’s where a pledge manager comes in. It allows you to easily get all this information from your backers after your Kickstarter ends.
Broadly speaking, you have two options when it comes to choosing a pledge manager. First, Kickstarter itself. At the time of creating this article, the Kickstarter pledge manager is in beta, but I wouldn’t be surprised if that changed very soon.
By the time you read this, they may have one so make sure to check on their website. The second option is 3rd party pledge managers. Essentially other companies that offer pledge management software. Again, at the time of making this article, the 3rd party pledge managers are the best in my opinion. For example, I’d go check out pledgemanager.com who is currently the official partner of Kickstarter.
Regardless of which pledge manager you choose, here are some tips:
Tip 1: Use Your Pledge Manager to Sell More
This is one of the most powerful parts of a pledge manager. Because you are already asking backers to do important stuff like confirming their shipping address and choosing variant information, why not see if they’d like to buy anything else.
Put in all your add-ons from the campaign and if you don’t have any more add-ons, just put your main product for sale again at a discounted rate – by the way, every time we’ve used this upsell feature, backers always buy more stuff which makes it a no-brainer in my book.
Tip 2: Charge for Shipping on Your Pledge Manager, Not Kickstarter
That’s right I do not recommend charging for shipping during your live Kickstarter campaign. Instead, use the pledge manager to charge for shipping. Charging for shipping later will ensure you are able to charge the most accurate rates based on backer’s validated delivery addresses.
Tip 3: Charge Taxes on Your Pledge Manager
If you’re wondering if you have to pay taxes on the money you get from Kickstarter, the answer is “yes.” It is recognized as income and if you’re in the US, even the individual states are going to want their cut. A good pledge manager will make charging for taxes based on location very easy, so make sure you set that up.
Follow These Steps to Launch a Successful Kickstarter
Alright you just learned the 17 steps to launch a successful Kickstarter this year. My goal was to pack as much value as I could, so I really hope you learned something from this article.
Whether you’re launching a tech product, a board game, or even a new glamping experience, these steps can help you. They’ve been used by creators from all different product categories, with all different budgets, and at all different stages of business.
The beauty of crowdfunding is that it can be both a funding and marketing tool at the same time. Follow these steps and you’ll be well on your way to a successful launch.
If you want some help along the way, we’re here to help. Simply click here to chat with my team. We’ll jump on a call, talk through your product and show you how we can help.
How to Launch a Successful Kickstarter Campaign: Frequently Asked Questions
What percentage of Kickstarter campaigns are successful?
According to Kickstarter’s own statistics, about 42% of campaigns successfully reach their funding goal. However, the success rate varies dramatically by category. For example, games and design tend to have higher success rates than technology.
But here’s the thing – creators who follow a proven system have a much higher success rate. At LaunchBoom, our campaigns had a success rate of 97.8% in 2024..
What is the best day of the week to launch a Kickstarter campaign?
Based on data from over 342,000 Kickstarter campaigns, Tuesday is the best day to launch. This is because email open rates tend to be highest on Tuesday, and email is typically how creators announce their campaigns.
How do you promote a Kickstarter campaign?
The most effective ways to promote a Kickstarter campaign are:
- Building a pre-launch email list with VIPs who put down a $1 reservation
- Running Meta ads (Facebook & Instagram)
- Working with micro and nano influencers
- Getting press coverage
- Using cross-promotions with other campaigns
- Implementing email marketing strategies before, during, and at the end of your campaign
How long should a Kickstarter campaign last?
The default campaign length on Kickstarter is 30 days, and that’s what I recommend for most creators. Longer campaigns (up to 60 days) tend to have a deeper “valley of death” in the middle, while shorter campaigns (around 21 days) can create more urgency but give you less time to implement marketing strategies.
How often do Kickstarters fail?
About 58% of Kickstarter campaigns fail to reach their funding goal. The main reasons include:
- Not building a pre-launch audience
- Setting the funding goal too high
- Poor product positioning
- Weak campaign page and video
- Ineffective marketing during the campaign
But remember – failure on Kickstarter doesn’t mean you have a bad product. Audrey’s Kublet failed at first, but after repositioning her product and building a stronger pre-launch audience, she raised over $150K on her second attempt.